
Posify POS
Complete Laravel-powered Point of Sale system for retail and food businesses — POS terminal, inventory, suppliers, purchase orders, cash register shifts, customer loyalty, expense tracking, and reports.
Introduction
Posify POS is a complete, single-application Point of Sale system built on Laravel 12. It covers every aspect of a retail or food business:
POS Terminal
Barcode scanning, split payments, thermal receipts, and cash register shifts.
Inventory & Purchasing
Products, variants, warehouses, suppliers, and purchase orders with stock receiving.
Reports & Admin
Sales, P&L, inventory valuation, expense, and product reports — all CSV exportable.
Everything runs as one Laravel application — no separate frontend server required, and the admin and POS work in a phone browser. An optional Flutter staff app is included as source in posify-app.zip if you want a native companion for the shop floor; it is not needed to run the POS. Follow this documentation to install and configure Posify POS on your server.
System Architecture
Posify POS is a monolithic Laravel application — one codebase, one deployment. Livewire handles reactive UI components server-side, so no separate JS build server is needed in production.
What's Included
- ✓ Laravel 12 full source code
- ✓ Web installer wizard
- ✓ Pre-seeded demo data (optional)
- ✓ Documentation
Tech Stack
- • PHP 8.2+ / Laravel 12
- • Livewire 4 / Alpine.js
- • Tailwind CSS v4
- • MySQL 5.7+ / MariaDB
- • Server-side barcode generation (picqer/php-barcode-generator)
Changelog
- ✓ POS terminal — products, inventory, orders, payments
- ✓ Customers, users, roles & permissions
- ✓ Multi-language, settings, REST API
- ✓ Web installer — browser-based multi-step setup wizard (requirements, purchase verification, database, admin, finish)
- ✓ Suppliers & Purchase Orders — supplier CRUD, PO with line items, stock receiving into inventory, supplier payments
- ✓ Cash register / shifts — open & close register sessions, cash in/out movements, printable Z-Report
- ✓ Returns & refunds — return items against an order with optional restock; payment status reflects partial/full refunds
- ✓ Customer accounts — due/credit ledger, loyalty points (earn on sale, redeem for value), per-customer ledger view
- ✓ Expense management — expense categories and expenses with date filtering
- ✓ Reports — Sales, Product, Category, Profit & Loss, Inventory Valuation, and Expense reports — each exportable to CSV
- ✓ Thermal receipts — 80mm / 58mm auto-printing alongside the existing A4 PDF invoice
- ✓ Barcode in POS — scan-to-search in the POS terminal, plus printable barcode label sheets (server-side SVG generation)
- ✓ Database backup & restore — admin-initiated SQL dump/restore (no shell access required)
- ✓ Loyalty settings — added to General Settings
- ✓ Help Desk & Customer Portal — support tickets with categories, assignment, internal notes, attachments and canned replies, plus a customer portal and public help centre (optional dedicated subdomain)
- ✓ AI Assistant (optional) — provider-agnostic AI (Anthropic Claude, OpenAI or Google Gemini) with an encrypted-at-rest API key: help-desk summarize/suggest/improve, automatic ticket category/priority/sentiment, and product SEO/content/image/inventory insights. See the AI Assistant guide
Server Requirements (VPS)
Minimum recommended specs for running Posify POS (Laravel + MySQL) on a VPS.
CPU
1 vCPU minimum. 2 vCPUs recommended for production.
RAM
1 GB minimum. 2 GB recommended.
OS
Ubuntu 22.04 LTS (recommended) or Debian 12.
Important Server Documentation
Follow these notes when the application shows a server error.
500 Internal Server Error — Common Fix
The most common cause is a missing .env file or missing Laravel app key:
Then update .env with your database credentials before continuing.
Storage Permissions
File uploads and cache will fail if storage folder permissions are wrong:
Install & Configure Nginx
1. Install Nginx
sudo apt update
sudo apt install -y nginx
sudo systemctl enable nginx
sudo systemctl start nginx
2. Virtual host — /etc/nginx/sites-available/yourdomain.com
server {
    listen 80;
    server_name yourdomain.com www.yourdomain.com;
    root /var/www/posify-pos/public;
    index index.php;

    add_header X-Frame-Options "SAMEORIGIN";
    add_header X-Content-Type-Options "nosniff";

    location / {
        try_files $uri $uri/ /index.php?$query_string;
    }

    location ~ \.php$ {
        include snippets/fastcgi-php.conf;
        fastcgi_pass unix:/var/run/php/php8.3-fpm.sock;
    }

    location ~ /\.ht { deny all; }
}
3. Enable site & reload
sudo ln -s /etc/nginx/sites-available/yourdomain.com /etc/nginx/sites-enabled/
sudo nginx -t
sudo systemctl reload nginxInstall & Configure MySQL
1. Install MySQL 8
sudo apt install -y mysql-server
sudo systemctl enable mysql
sudo mysql_secure_installation
2. Create database & user
sudo mysql -u root -p

CREATE DATABASE posify CHARACTER SET utf8mb4 COLLATE utf8mb4_unicode_ci;
CREATE USER 'posify_user'@'localhost' IDENTIFIED BY 'StrongPassword!';
GRANT ALL PRIVILEGES ON posify.* TO 'posify_user'@'localhost';
FLUSH PRIVILEGES;
EXIT;
3. Update Laravel .env
DB_CONNECTION=mysql
DB_HOST=127.0.0.1
DB_PORT=3306
DB_DATABASE=posify
DB_USERNAME=posify_user
DB_PASSWORD=StrongPassword!Install PHP & Extensions
Posify POS requires PHP 8.2 or higher. The commands below install PHP 8.3 (recommended) with all required extensions.
sudo apt install -y software-properties-common
sudo add-apt-repository ppa:ondrej/php
sudo apt update
sudo apt install -y php8.3 php8.3-fpm php8.3-mysql php8.3-mbstring \
  php8.3-xml php8.3-bcmath php8.3-curl php8.3-zip php8.3-gd php8.3-intl

sudo systemctl enable php8.3-fpm
sudo systemctl start php8.3-fpmphp -v should show PHP 8.3.x
Install Composer
curl -sS https://getcomposer.org/installer | php
sudo mv composer.phar /usr/local/bin/composer
composer --version
Then inside your project directory:
cd /var/www/posify-pos
composer install --optimize-autoloader --no-devDomain & DNS Configuration
Point your domain to the VPS IP via your registrar's DNS panel.
| Type | Name / Host | Value | TTL |
|---|---|---|---|
| A | @ | YOUR_VPS_IP | Auto |
| A | www | YOUR_VPS_IP | Auto |
dig yourdomain.com.
SSL Setup with Certbot (HTTPS)
1. Install Certbot
sudo apt install -y certbot python3-certbot-nginx2. Obtain certificate
sudo certbot --nginx -d yourdomain.com -d www.yourdomain.com3. Verify & test auto-renewal
sudo nginx -t && sudo systemctl reload nginx
sudo certbot renew --dry-runAPP_URL=https://yourdomain.com in your Laravel .env and clear cache: php artisan config:clear
Shared Hosting Requirements
Confirm your cPanel environment supports the following before deploying.
Laravel / Posify POS
- ✓ PHP 8.2+ via MultiPHP or PHP Selector
- ✓ MySQL 5.7+ or MariaDB
- ✓ Composer (SSH Terminal)
- ✓ SSH Terminal access (cPanel → Terminal)
- ✓ Addon Domain / Subdomain creation
- ✓ File Manager or FTP access
- ✓ AutoSSL / Let's Encrypt SSL
Laravel Setup on cPanel
Deploy Posify POS on shared hosting step by step.
Create Domain & Point to public/
In cPanel → Domains, add your domain and set its Document Root to the project's public/ folder:
/home/yourusername/posify-pos/public
Upload Project Files
Upload the ZIP via cPanel → File Manager then extract:
cd ~/posify-pos
unzip posify-pos.zip -d .
rm posify-pos.zip
Set PHP Version to 8.2+
In cPanel → MultiPHP Manager (or PHP Selector), select your domain and set PHP to 8.2 or newer. Enable extensions: pdo_mysql mbstring xml curl zip gd bcmath fileinfo.
Create MySQL Database
cPanel → MySQL Databases:
- Create database:
yourusername_posify - Create user with a strong password
- Add user to database with All Privileges
Configure .env
Rename .env.example → .env and edit:
# App
APP_NAME="Posify POS"
APP_ENV=production
APP_DEBUG=false
APP_URL=https://yourdomain.com

# Database
DB_CONNECTION=mysql
DB_HOST=127.0.0.1
DB_PORT=3306
DB_DATABASE=yourusername_posify
DB_USERNAME=yourusername_dbuser
DB_PASSWORD=StrongPassword!

# Mail (optional)
MAIL_MAILER=smtp
MAIL_HOST=mail.yourdomain.com
MAIL_PORT=587
MAIL_USERNAME=no-reply@yourdomain.com
MAIL_PASSWORD=your_email_password
MAIL_FROM_ADDRESS=no-reply@yourdomain.com
Install Composer & Run Artisan
cd ~/posify-pos

curl -sS https://getcomposer.org/installer | php
php composer.phar install --optimize-autoloader --no-dev

php artisan key:generate
php artisan migrate --force
php artisan db:seed --force
php artisan storage:link
php artisan optimize
Set Permissions & Enable SSL
chmod -R 755 storage bootstrap/cache
Enable SSL via cPanel → SSL/TLS → AutoSSL or Let's Encrypt.
Test the Installation
Visit your domain — you should see the login page:
Server Requirements
Verify your hosting environment before installation.
PHP & Extensions
- ✓ PHP 8.2 or higher
- ✓ OpenSSL
- ✓ PDO + PDO_MySQL Extension
- ✓ Mbstring Extension
- ✓ Tokenizer Extension
- ✓ XML Extension
- ✓ Ctype Extension
- ✓ cURL Extension
- ✓ JSON Extension
- ✓ BCMath Extension
- ✓ Fileinfo Extension
- ✓ ZIP Extension
- ✓ GD Extension
Database & Server
- ✓ MySQL 5.7+ or MariaDB
- ✓ Composer 2.x
- ✓ Apache or Nginx
- ✓ SSL Certificate (HTTPS)
- ✓ 512MB+ RAM
Installation Guide
Deploy Posify POS on your VPS. You can use the web installer (no SSH needed for setup) or install manually via SSH.
Download from Envato
Log in to CodeCanyon → Downloads → Posify POS → Download All Files & Documentation. Extract the ZIP.
Upload Project to Server
Option A — SCP / FTP
scp posify-pos.zip user@YOUR_VPS_IP:/var/www/
ssh user@YOUR_VPS_IP
cd /var/www && unzip posify-pos.zip -d posify-pos
Option B — Git
sudo mkdir -p /var/www/posify-pos
cd /var/www/posify-pos
sudo git clone https://github.com/your-repo/posify-pos.git .
Configure .env & Choose Install Method
Copy .env.example → .env, then visit the installer in your browser and follow the on-screen steps — no SSH needed for the rest of the setup:
Installer Steps Preview
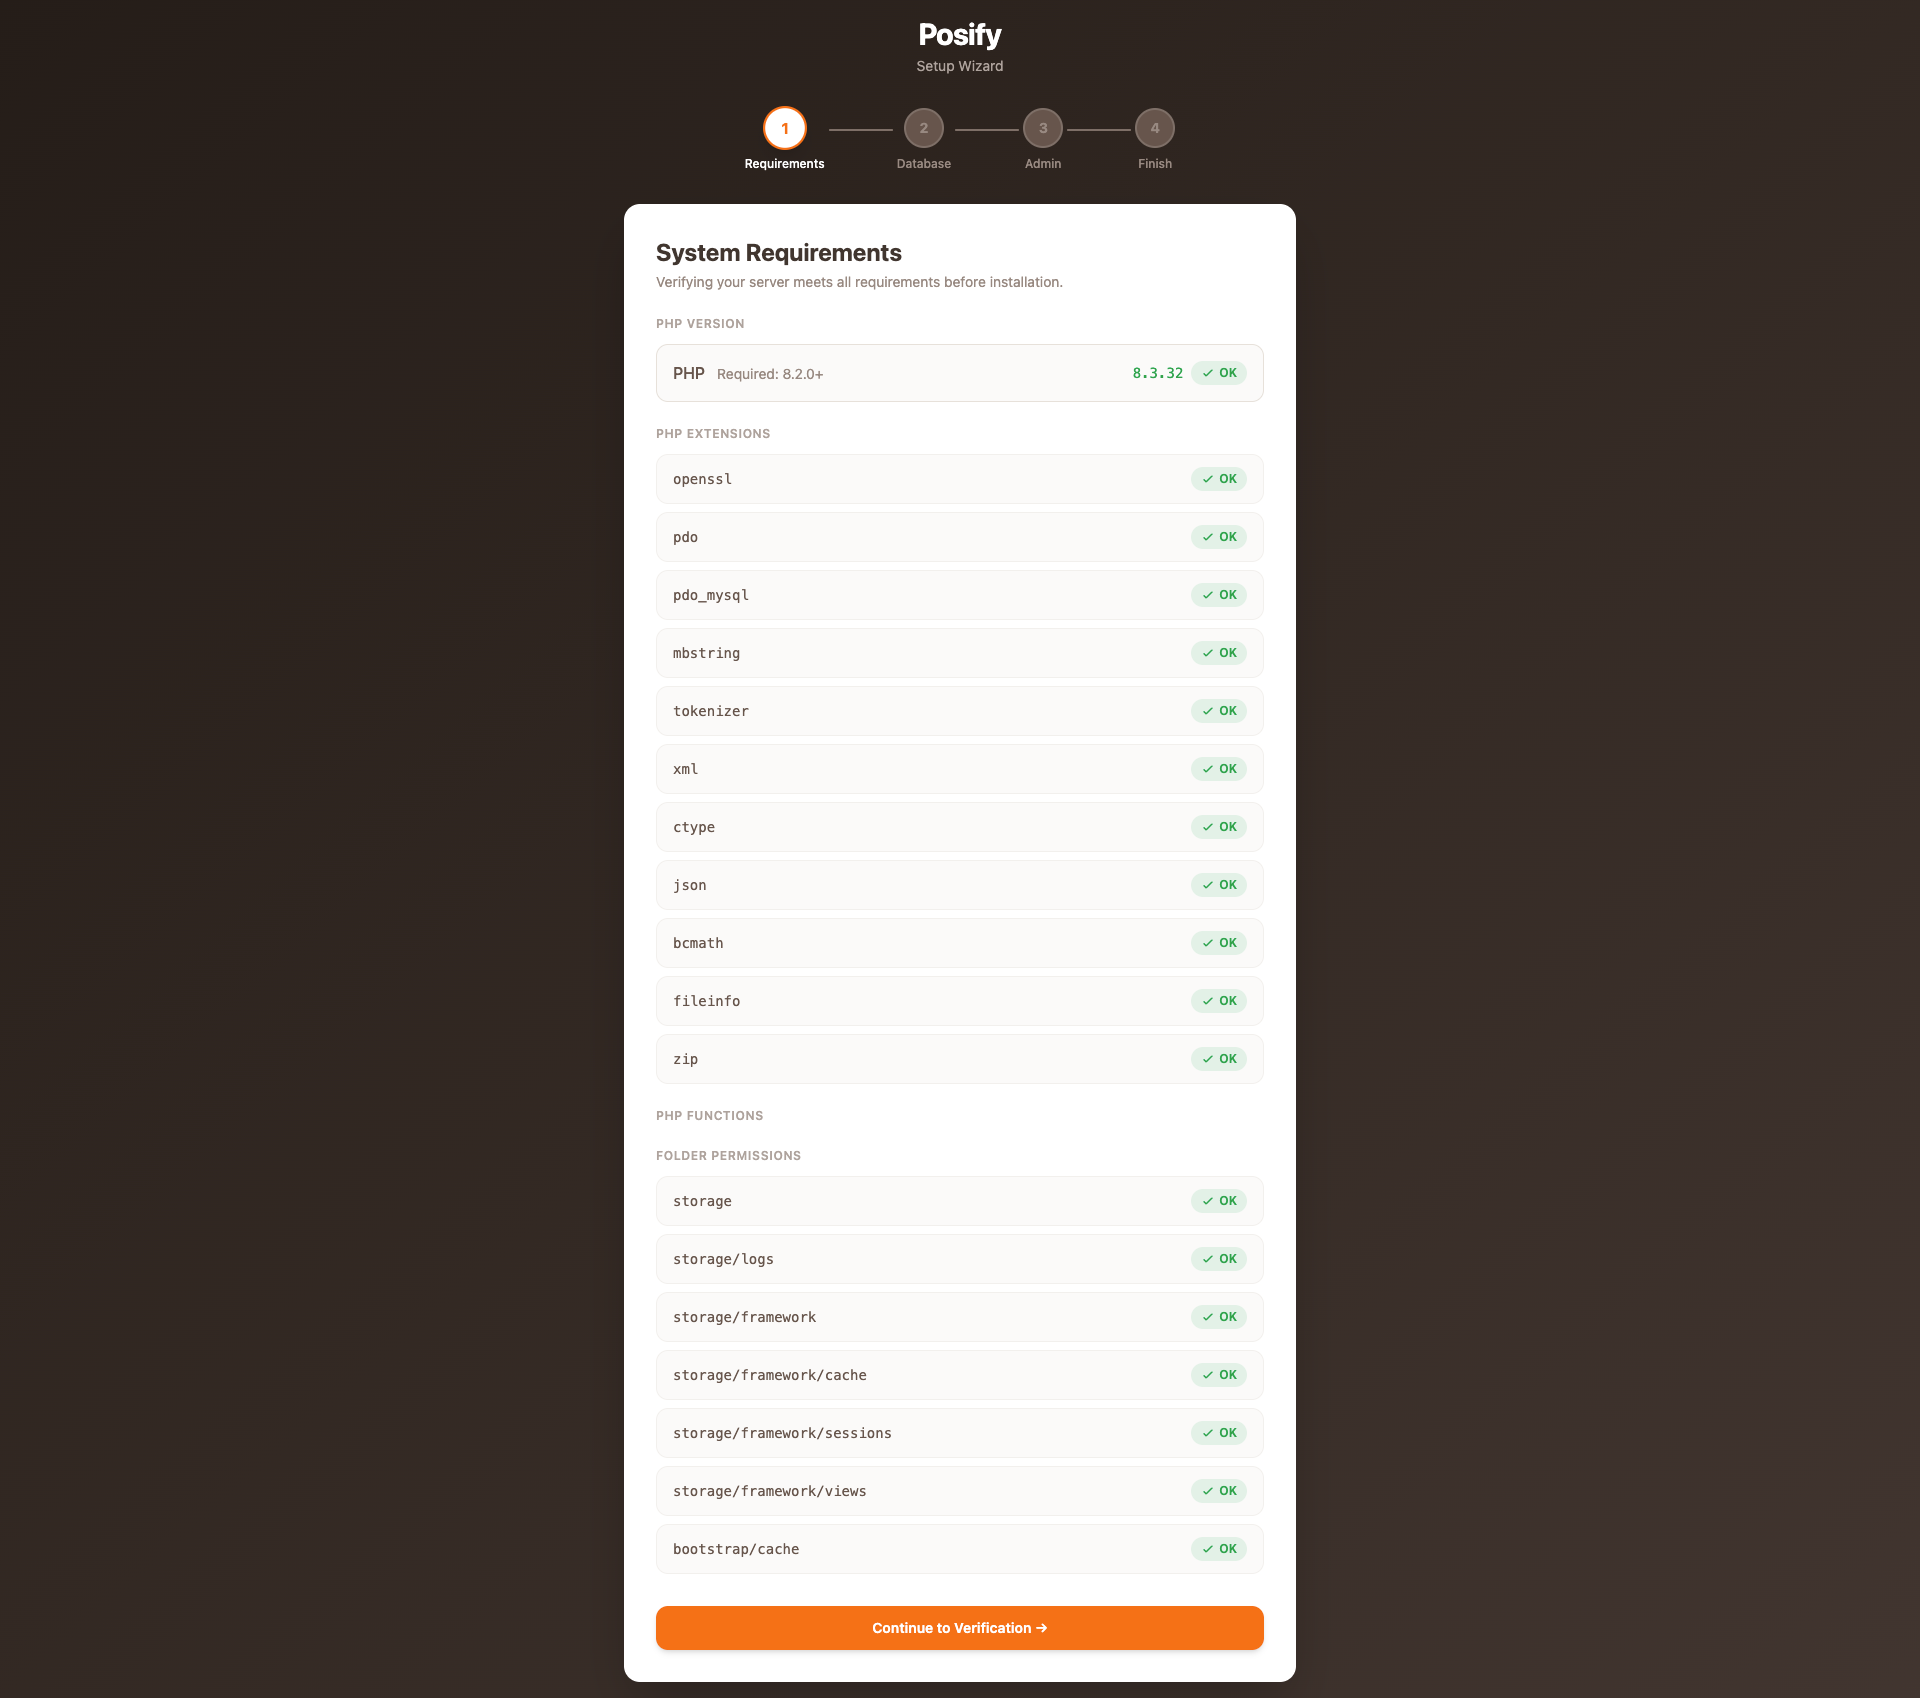
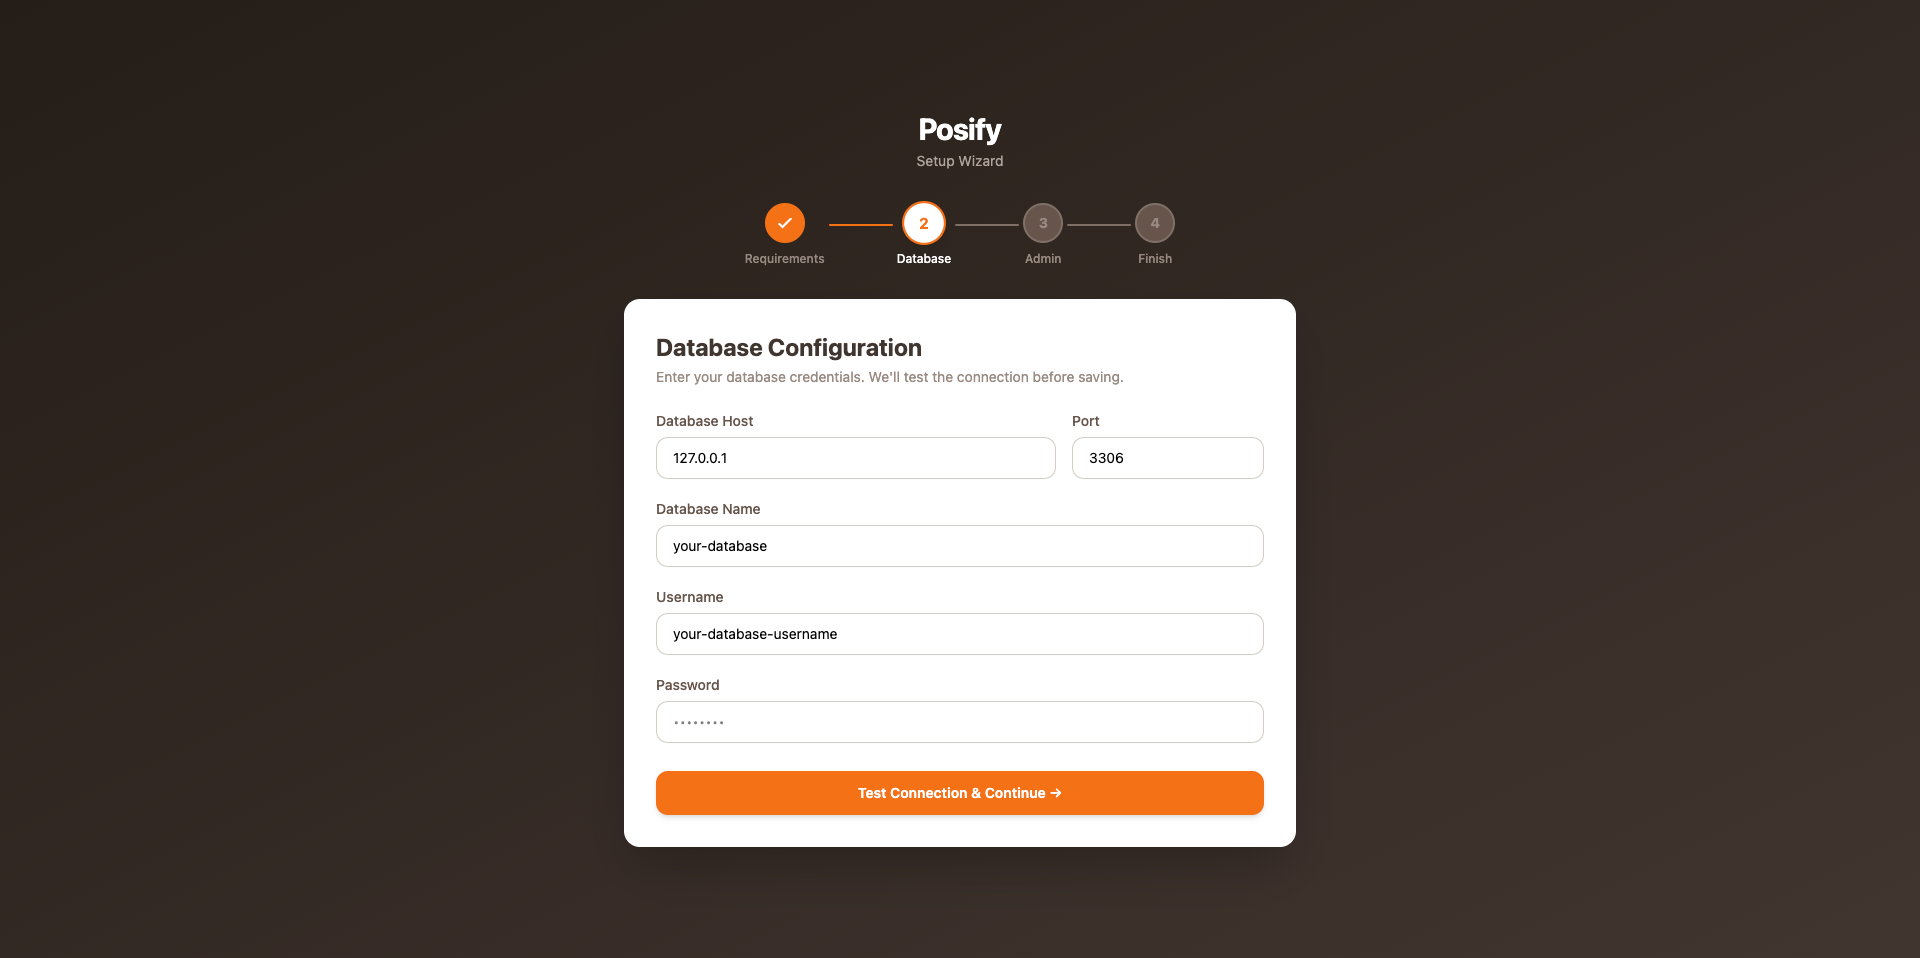
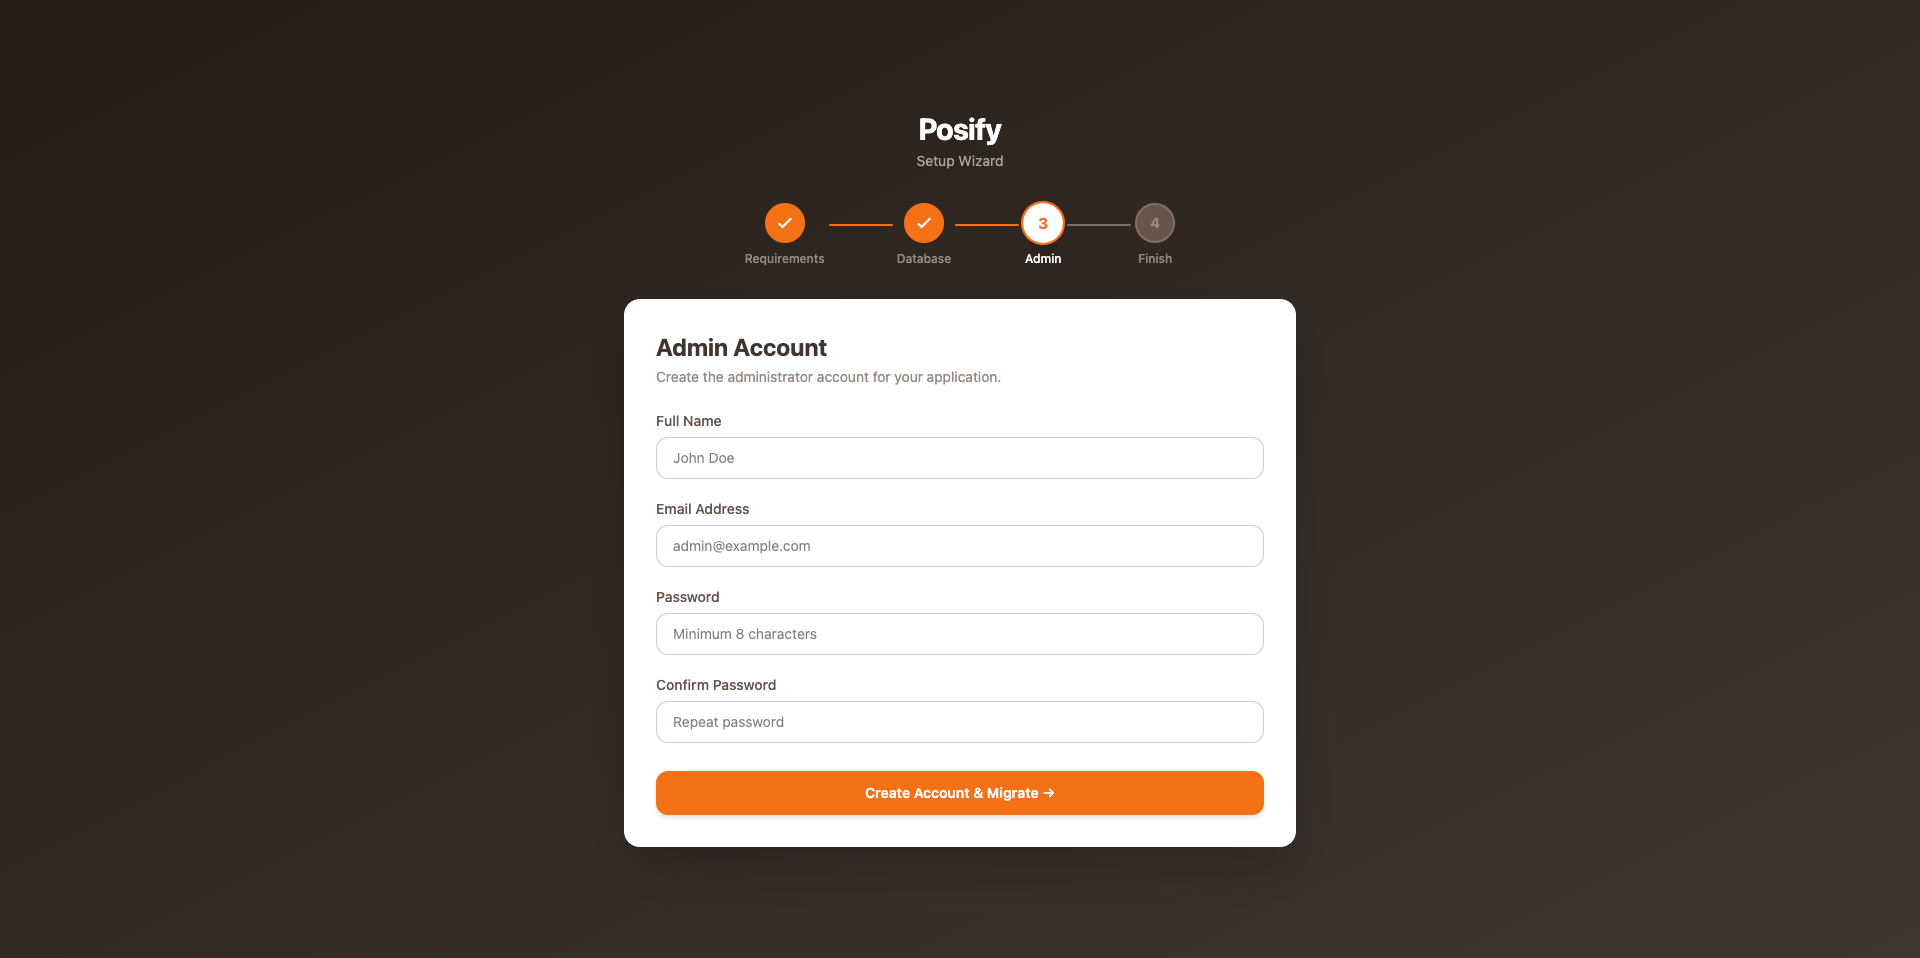
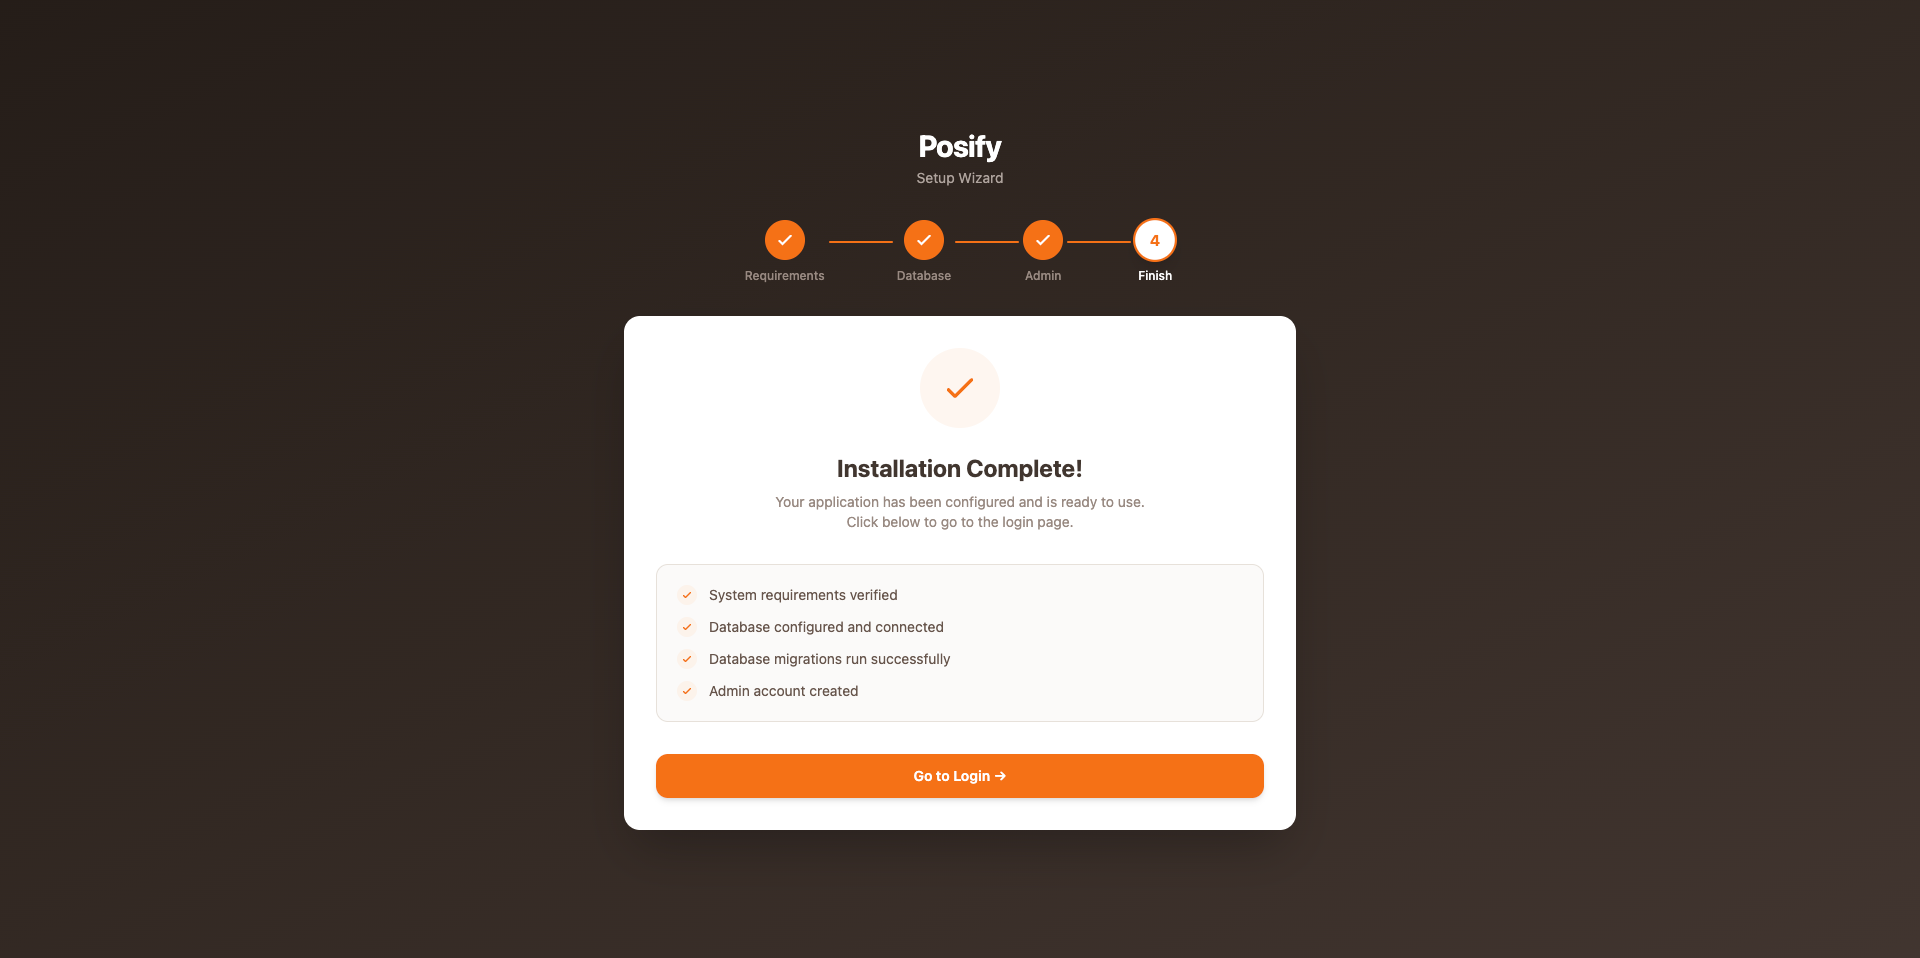
Copy and edit .env via SSH, then run artisan commands:
cd /var/www/posify-pos
cp .env.example .env
nano .env   # set APP_URL, DB_* values

composer install --optimize-autoloader --no-dev
php artisan key:generate
php artisan migrate --force
php artisan db:seed --force
php artisan storage:link
php artisan optimize
Set Folder Permissions
chmod -R 775 storage bootstrap/cache
chown -R www-data:www-data storage bootstrap/cache
Test the Installation
Open your browser and visit the admin panel — you should see the login page.
Before going live, verify:
APP_DEBUG=false- Storage symlink exists:
ls -la public/storage - Folder permissions set on
storage/andbootstrap/cache/ - SSL certificate active
Configuration
Key settings available from Admin → Settings after installation.
General Settings
- • Store name, logo, currency, timezone
- • Tax rate and tax name
- • Loyalty points rate (earn per sale amount) and redemption rate
- • Receipt header / footer text
- • Default language
Thermal Receipt Printer
Configure from Settings → Receipt Settings. Choose paper width (80mm or 58mm) and enable auto-print after POS sale.
Mail (SMTP)
Set in your .env file:
MAIL_MAILER=smtp
MAIL_HOST=smtp.mailtrap.io
MAIL_PORT=587
MAIL_USERNAME=your_username
MAIL_PASSWORD=your_password
MAIL_FROM_ADDRESS=no-reply@yourdomain.com
MAIL_FROM_NAME="Posify POS"
Queue Worker & Background Jobs
Posify POS ships with QUEUE_CONNECTION=sync in .env — emails and notifications are sent immediately during the request, so everything works out of the box with no worker process and no extra setup.
sync.
1. Enable background sending
Set the queue driver to database in your .env, then clear the config cache:
QUEUE_CONNECTION=database
php artisan config:clear
Queued jobs are now stored in the database — but they only run while a queue worker is running. Pick one of the options below.
2a. Recommended (VPS): Supervisor
Supervisor keeps the worker alive permanently and restarts it if it crashes:
sudo apt install -y supervisor
sudo nano /etc/supervisor/conf.d/posify-worker.conf
[program:posify-worker]
process_name=%(program_name)s_%(process_num)02d
command=php /var/www/posify-pos/artisan queue:work database --sleep=3 --tries=3 --max-time=3600
autostart=true
autorestart=true
stopasgroup=true
killasgroup=true
user=www-data
numprocs=1
redirect_stderr=true
stdout_logfile=/var/www/posify-pos/storage/logs/worker.log
stopwaitsecs=3600
sudo supervisorctl reread
sudo supervisorctl update
sudo supervisorctl start posify-worker:*
2b. Fallback (shared hosting): Cron
No Supervisor on shared hosting? Add a cron job (cPanel → Cron Jobs) that drains the queue every minute and exits when it's empty:
* * * * * php /home/yourusername/posify-pos/artisan queue:work --stop-when-empty
Adjust the path to your installation. Emails may be delayed by up to a minute — acceptable for most stores.
sudo supervisorctl restart posify-worker:* or php artisan queue:restart) so it picks up the new code.
Features
All modules available in Posify POS v1.0.0.
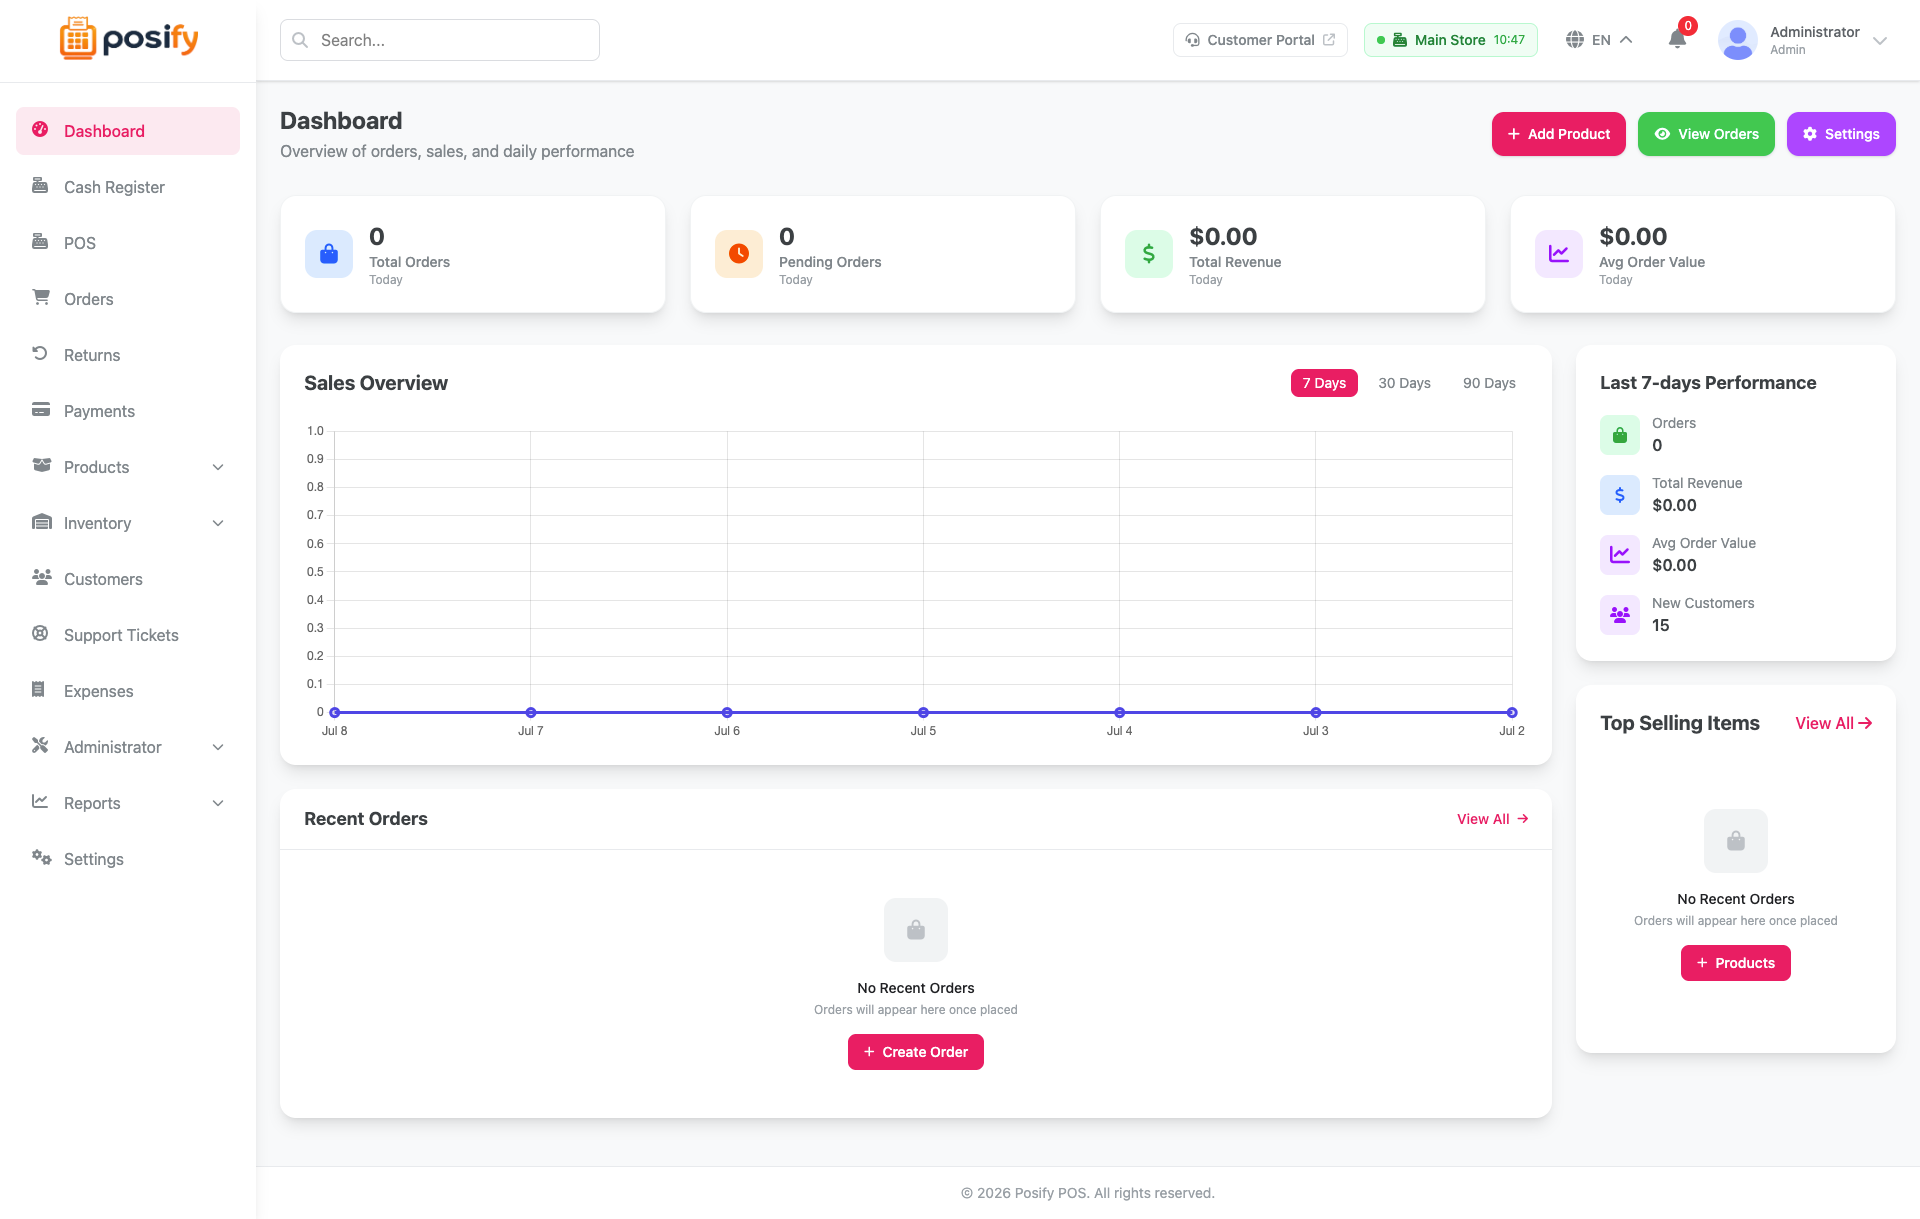
Dashboard
Real-time overview of store performance — today's revenue, orders, top products, and low-stock alerts.
- ✓ Daily, weekly, and monthly revenue charts
- ✓ Total orders and top-selling products
- ✓ Low-stock product alerts
- ✓ Recent order activity feed
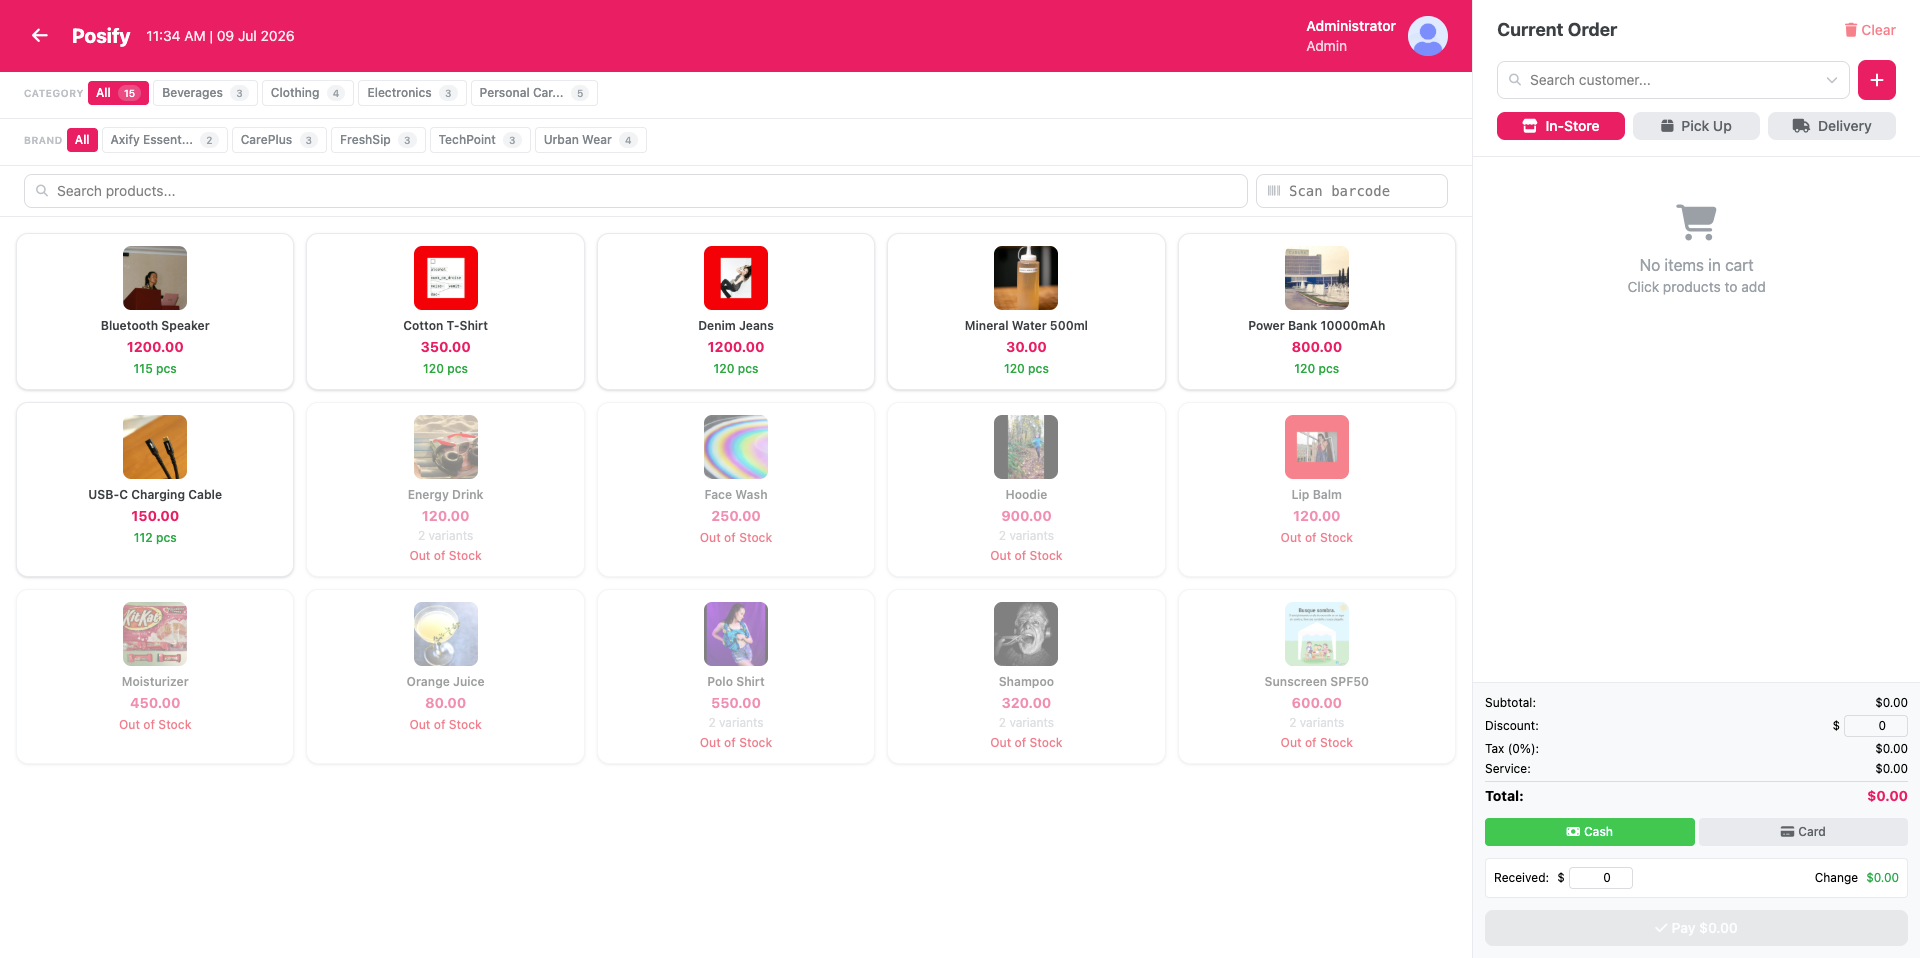
POS Terminal
Fast checkout screen with barcode scan-to-add, split payments, discounts, and instant thermal receipt printing.
- ✓ Barcode scan-to-search (USB/Bluetooth scanner)
- ✓ Cash, card, and split payment support
- ✓ 80mm / 58mm thermal receipt + A4 PDF
- ✓ Redeem customer loyalty points at checkout
- ✓ Orders sync with inventory automatically
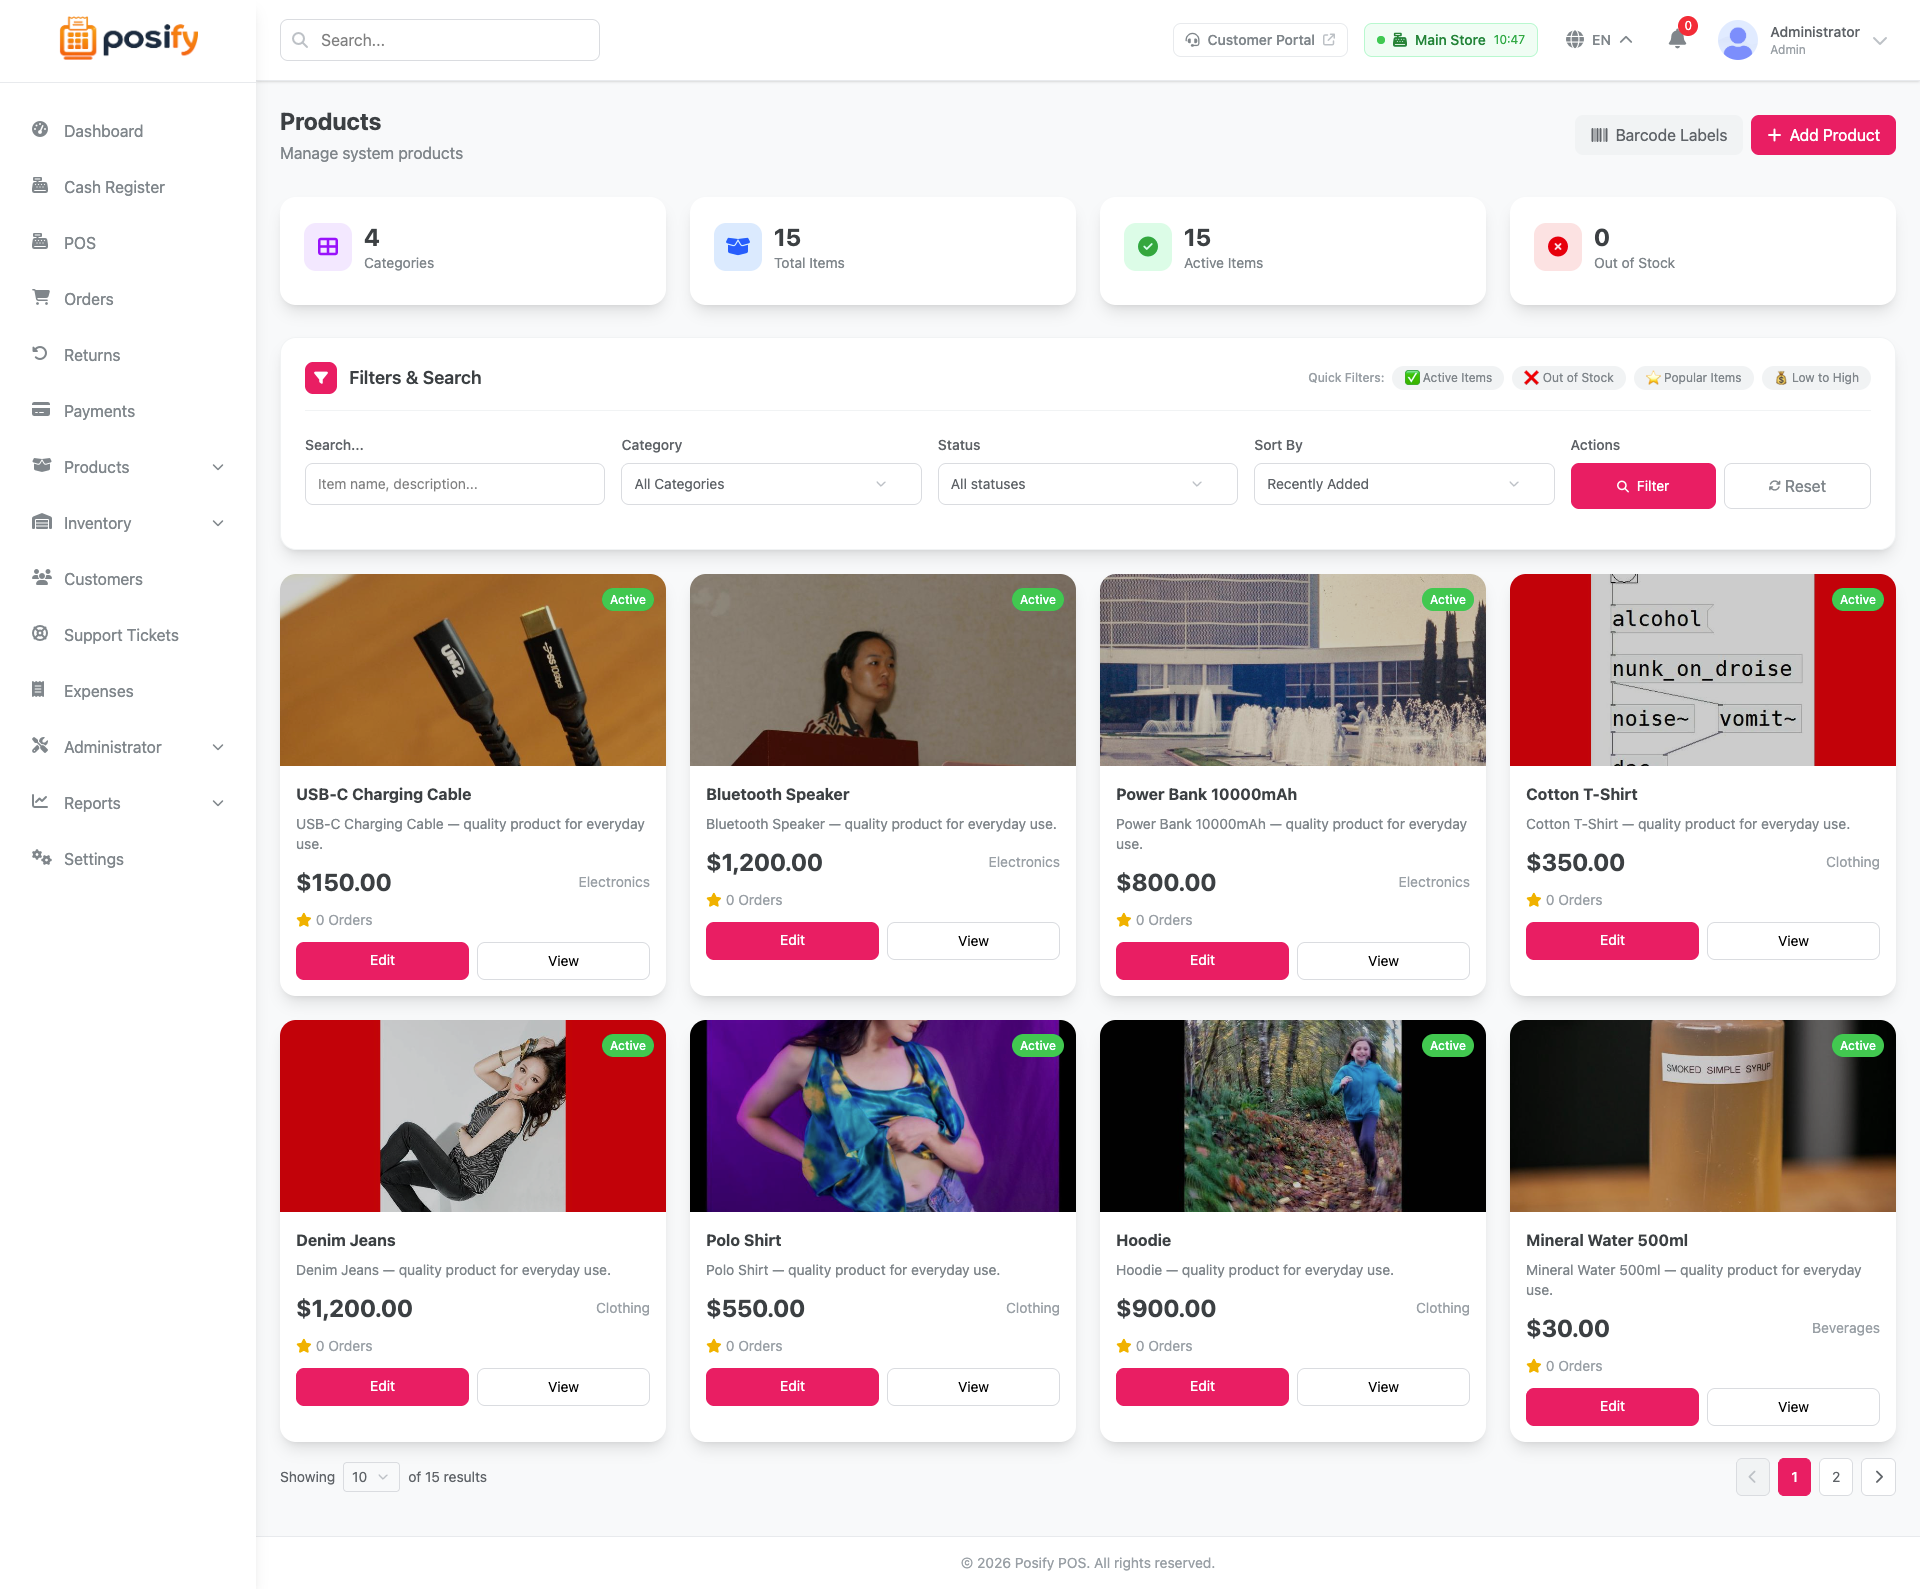
Products & Inventory
Full product catalog with categories, brands, units, variants, and warehouse-level stock tracking.
- ✓ Products with variants, addons, and images
- ✓ Categories, brands, and units of measure
- ✓ Per-warehouse stock levels and movements
- ✓ Stock transfers between warehouses
- ✓ Printable barcode label sheets (server-side SVG)
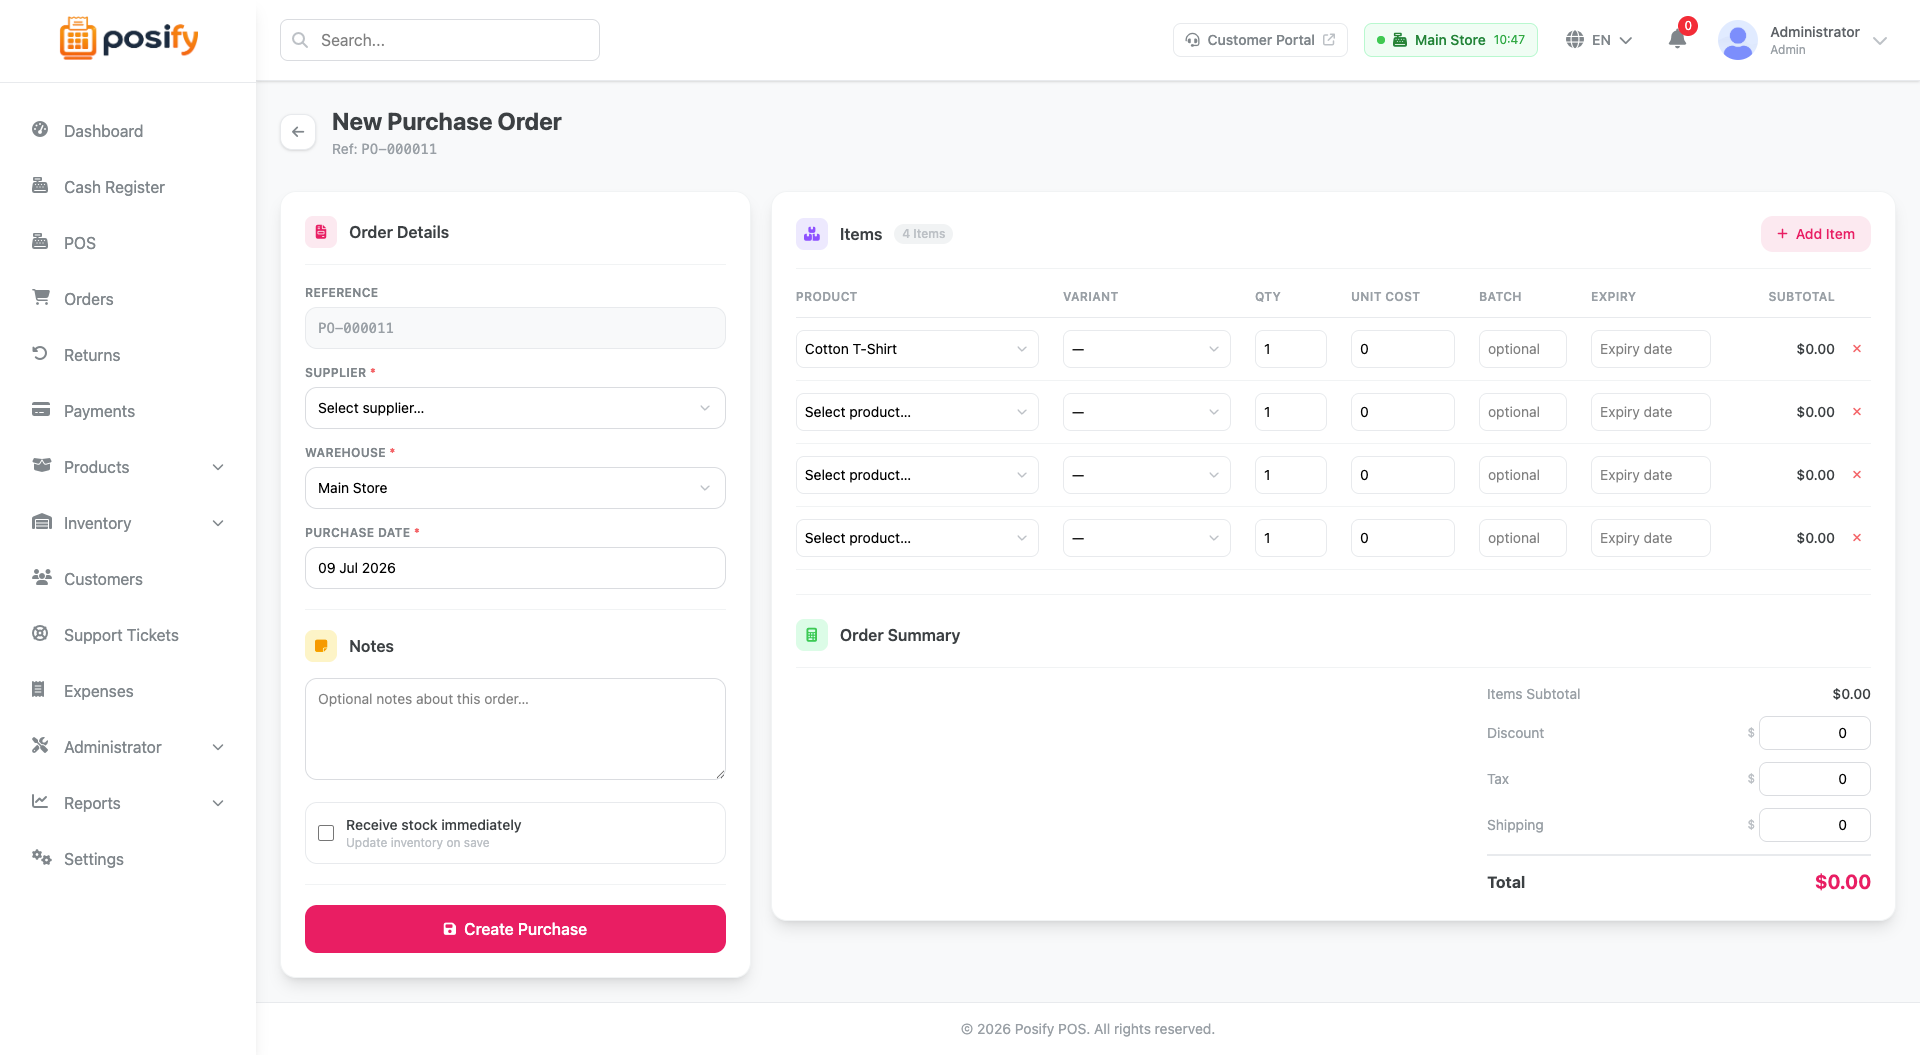
Suppliers & Purchase Orders
Manage supplier relationships and purchase orders from order creation through stock receiving.
- ✓ Supplier CRUD with contact details
- ✓ Purchase orders with line items and costs
- ✓ Receive stock into inventory from POs
- ✓ Track supplier payments and balances
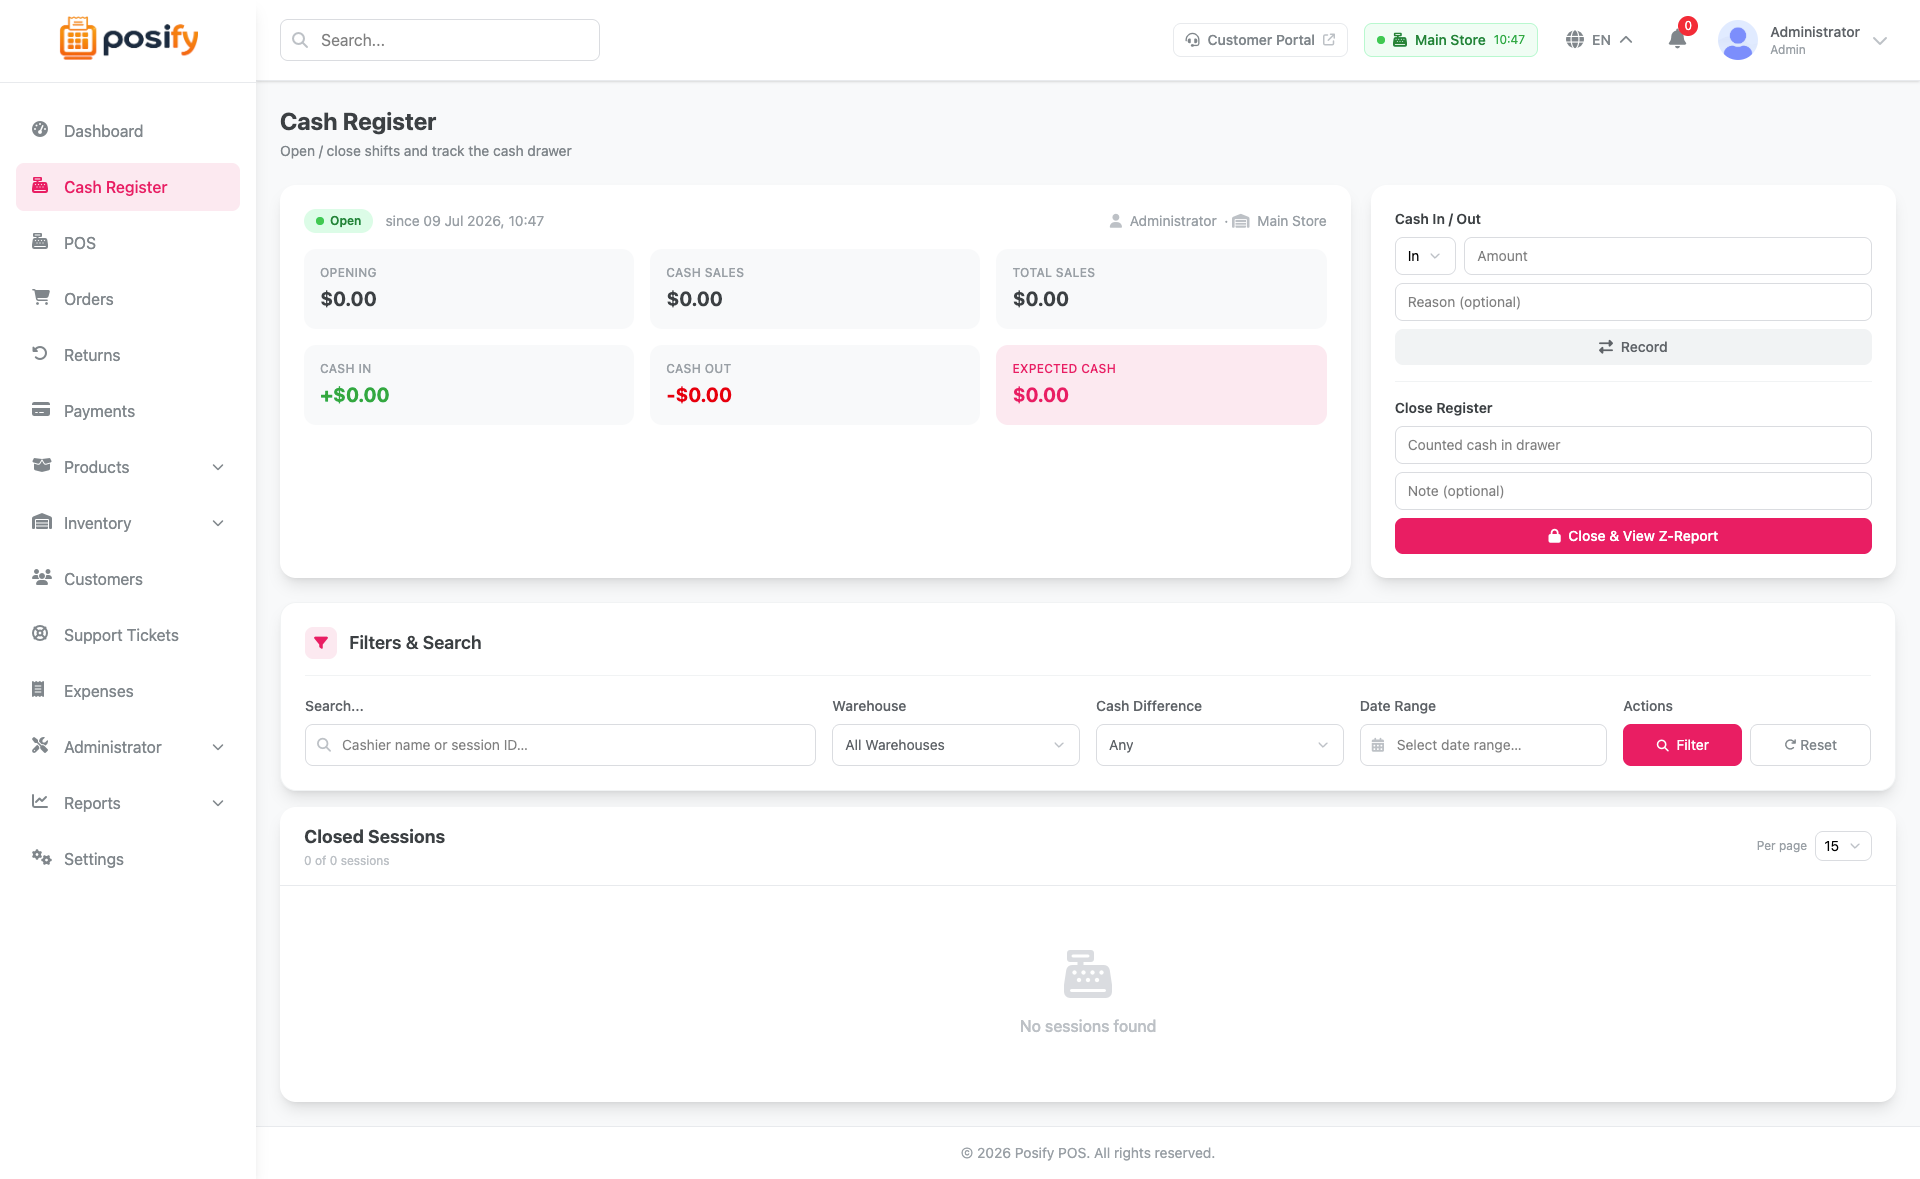
Cash Register & Returns
Full shift management with Z-Reports and a complete returns/refund flow with restock option.
- ✓ Open/close register sessions with opening cash
- ✓ Cash in/out movements during shift
- ✓ Printable Z-Report on close
- ✓ Return items against an order (with optional restock)
- ✓ Payment status auto-updates to partial/full refund
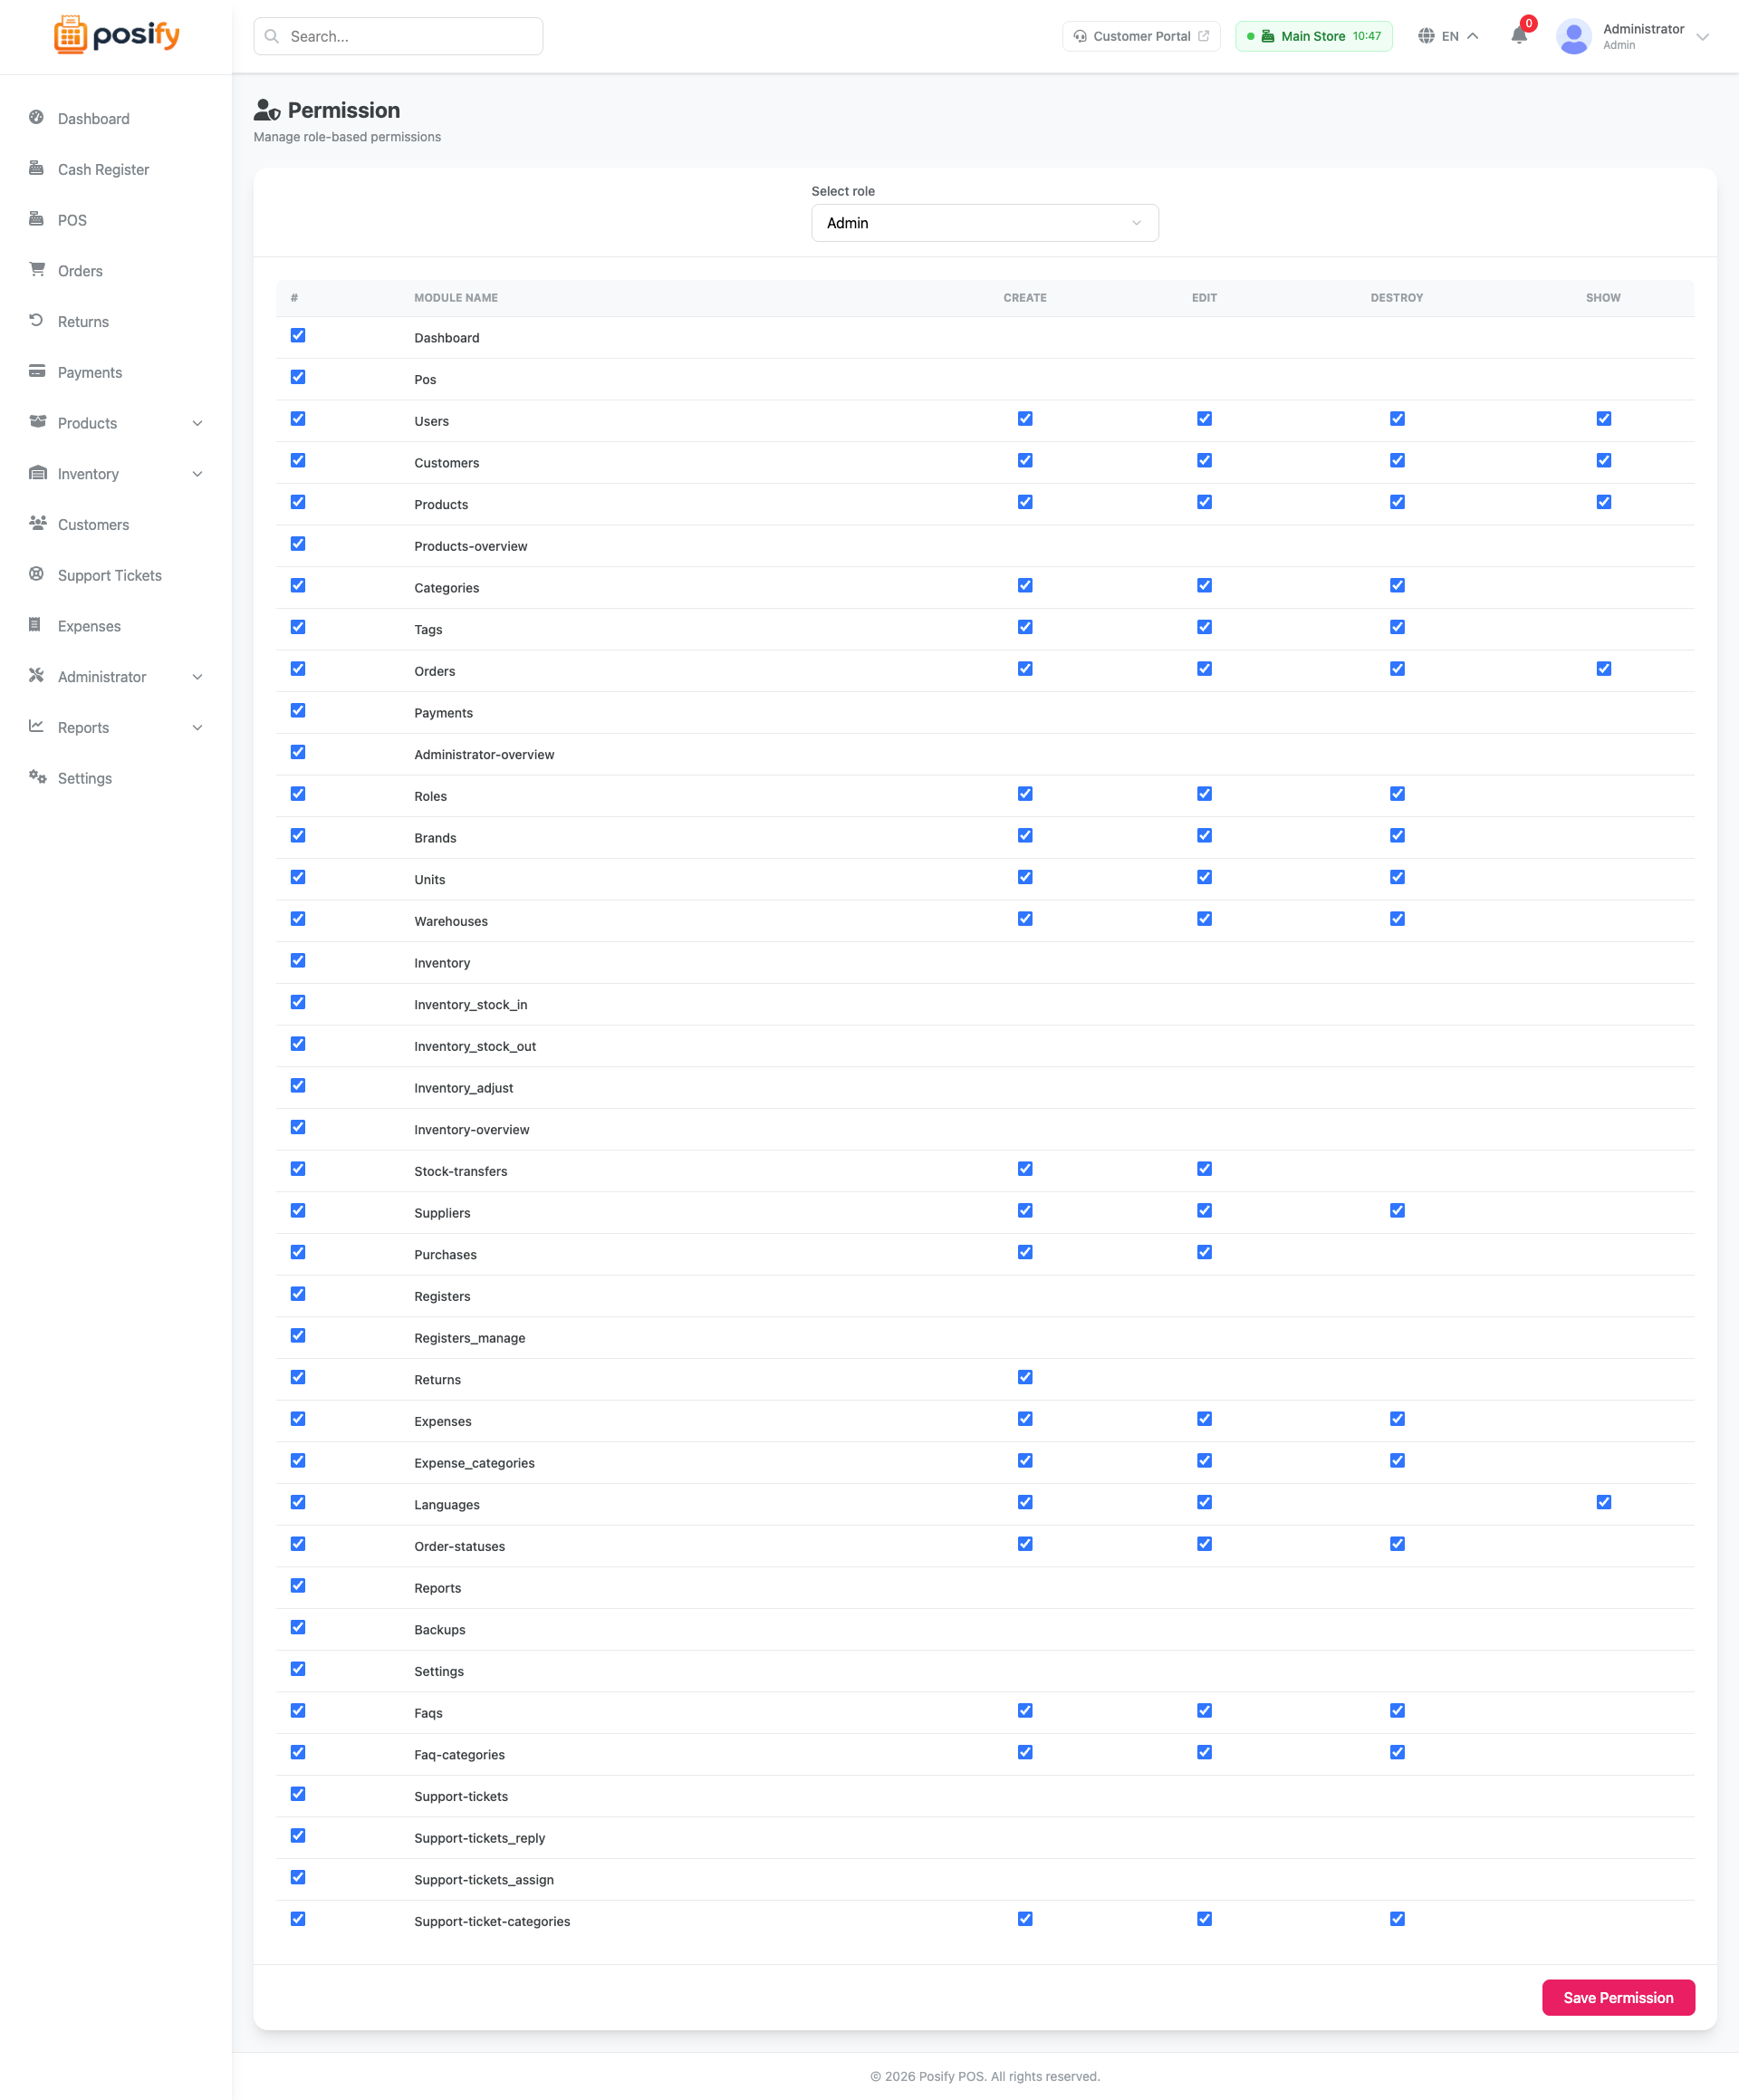
Roles & Permissions
Fine-grained role-based access control — define exactly what each staff member can see and do.
- ✓ Unlimited custom roles (cashier, manager, admin)
- ✓ Toggle individual permissions per role
- ✓ Assign multiple roles to one user
- ✓ Activity log of all admin actions
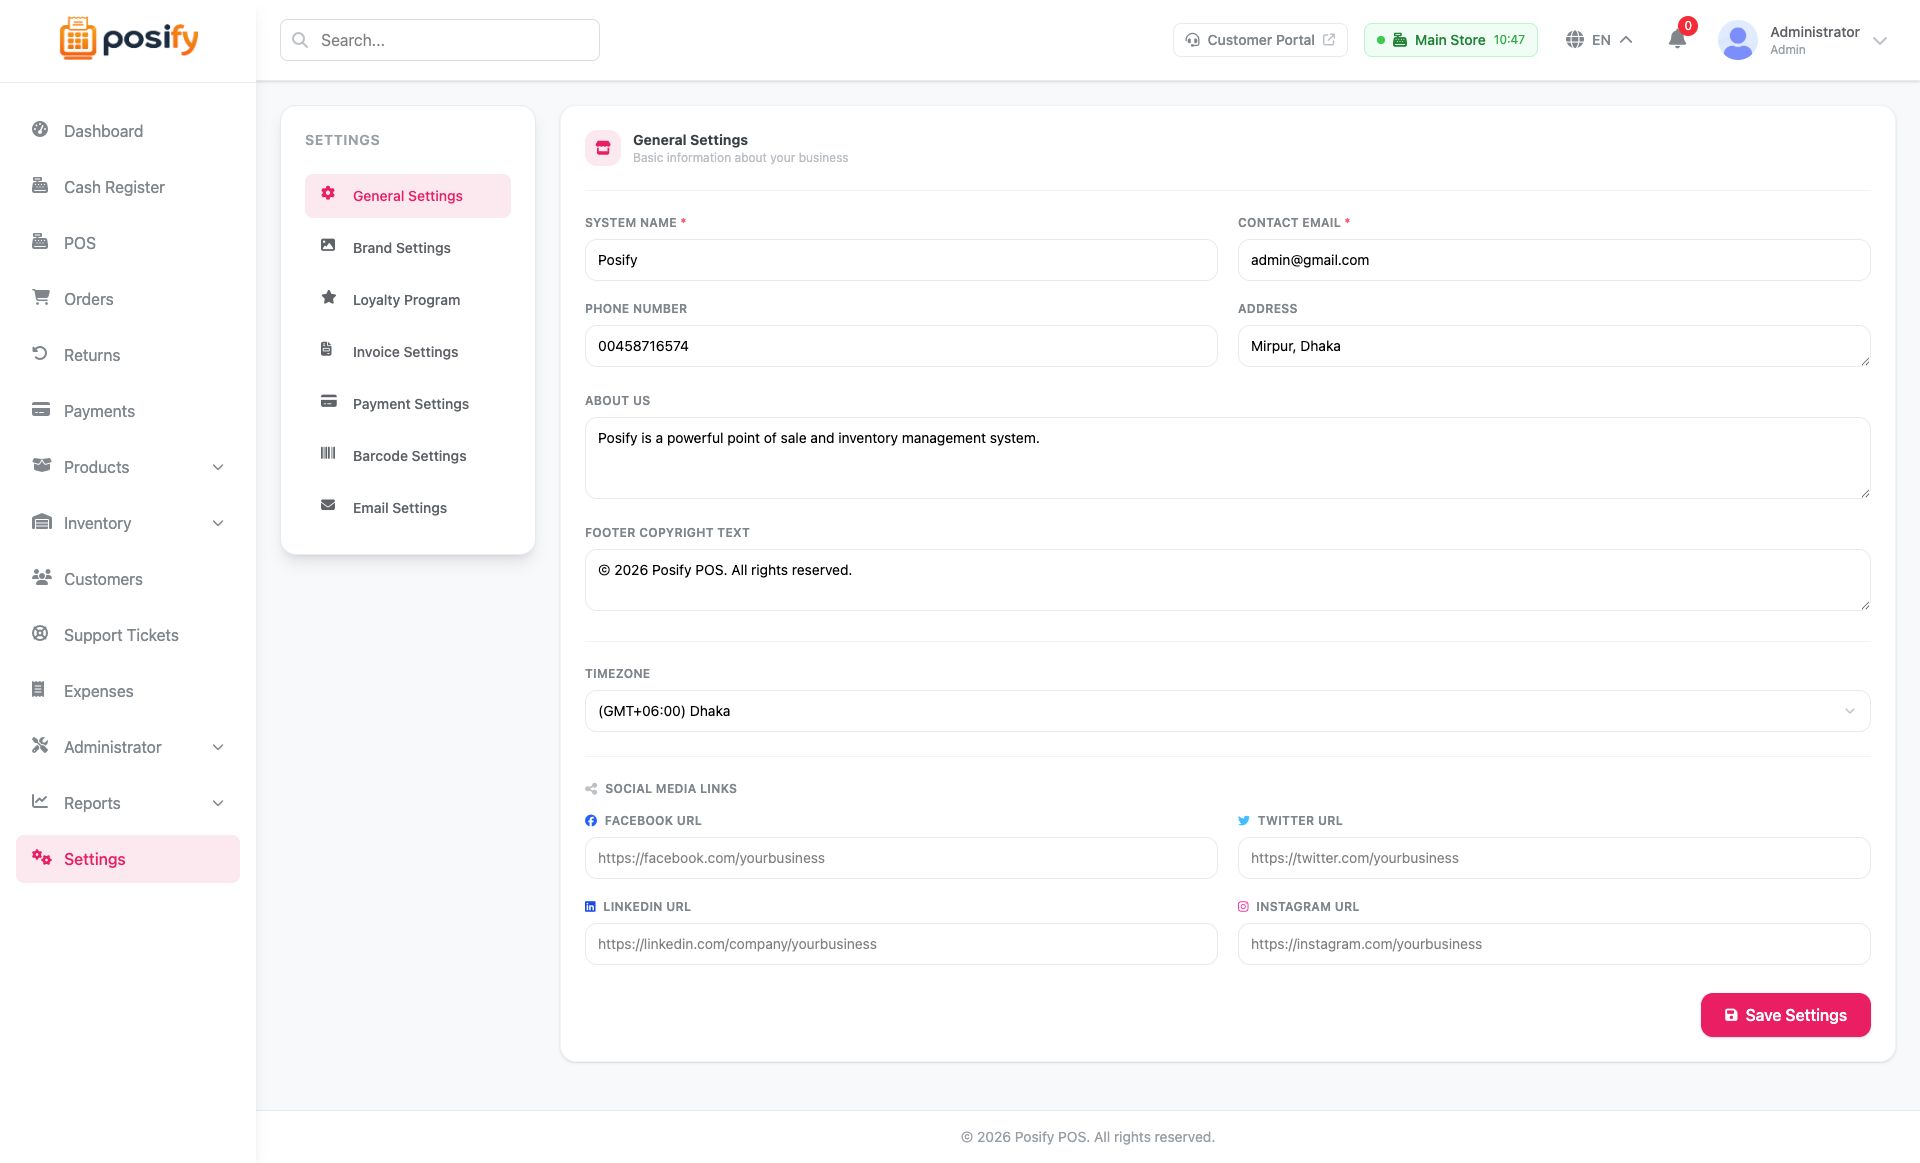
Settings & Utilities
Store settings, multi-language management, database backup/restore, and more — all from the admin panel.
- ✓ Store info, currency, tax, and receipt settings
- ✓ Loyalty points earn/redeem rates
- ✓ Multi-language with admin-editable translations
- ✓ Database backup & restore (no shell needed)
AI Assistant
Posify ships with an optional AI Assistant that adds a set of "magic" helpers across the
help desk and the product catalog. It is provider-agnostic — you bring your own API key
for Anthropic Claude, OpenAI, or Google Gemini — and it is
configured entirely from the admin panel. No .env
editing is required.
Help-desk assist
Summarize a ticket, draft a reply, or polish a draft you already wrote.
Auto-triage
Category, priority and customer sentiment applied to tickets automatically.
Product Insights
Score a product for SEO, content, images and inventory with fixes to apply.
Setting Up the AI Assistant
Setup takes a couple of minutes. You will need an API key from one AI provider. AI is billed by that provider on a pay-as-you-go basis (bring-your-own-key) — Posify does not resell or mark up usage.
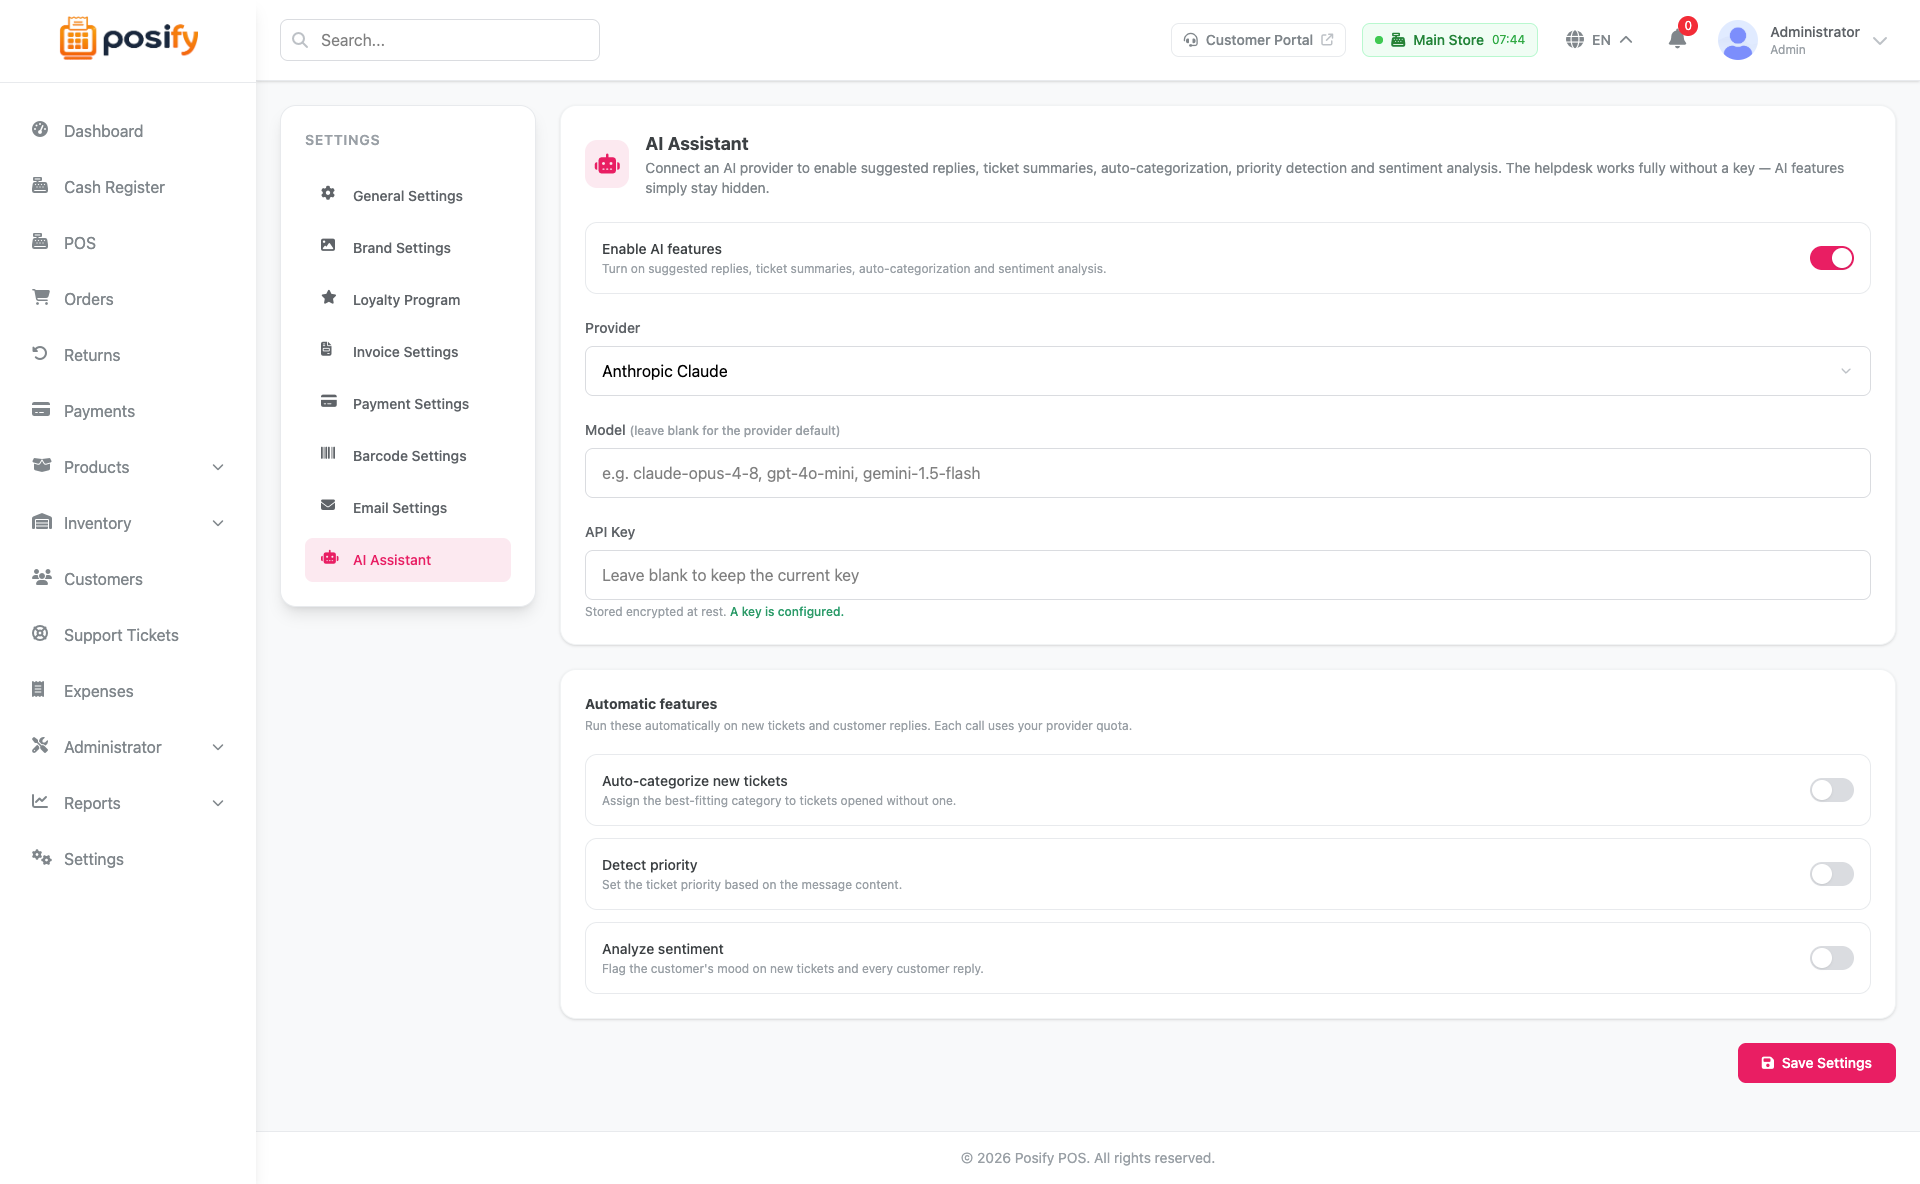
1 · Get an API key
Create a key with whichever provider you prefer:
| Provider | Where to get a key | Default model |
|---|---|---|
| Anthropic Claude | console.anthropic.com → API Keys | claude-opus-4-8 |
| OpenAI | platform.openai.com → API keys | gpt-4o-mini |
| Google Gemini | aistudio.google.com → Get API key | gemini-1.5-flash |
2 · Enter it in Posify
- Go to Admin → Settings → AI Assistant.
- Turn on Enable AI features.
- Pick your Provider (Claude, OpenAI or Gemini).
- Model — leave blank to use the provider default above, or type a specific model name (e.g.
gpt-4o). - Paste your API key and click Save settings.
3 · (Optional) Turn on automatic triage
On the same settings page, the Automatic features card lets you enable hands-off help-desk triage. These run quietly in the background whenever a ticket is created or a customer replies:
- • Auto-categorize — files new tickets into the best-fitting category.
- • Auto-priority — sets new tickets to low / normal / high / urgent.
- • Auto-sentiment — reads the customer's tone (positive / neutral / negative / frustrated) and refreshes it on every new customer message.
api.anthropic.com,
api.openai.com or
generativelanguage.googleapis.com). If your firewall
blocks outbound traffic, whitelist the relevant host.
What the AI Assistant Can Do
Once configured, three groups of AI features light up across the admin.
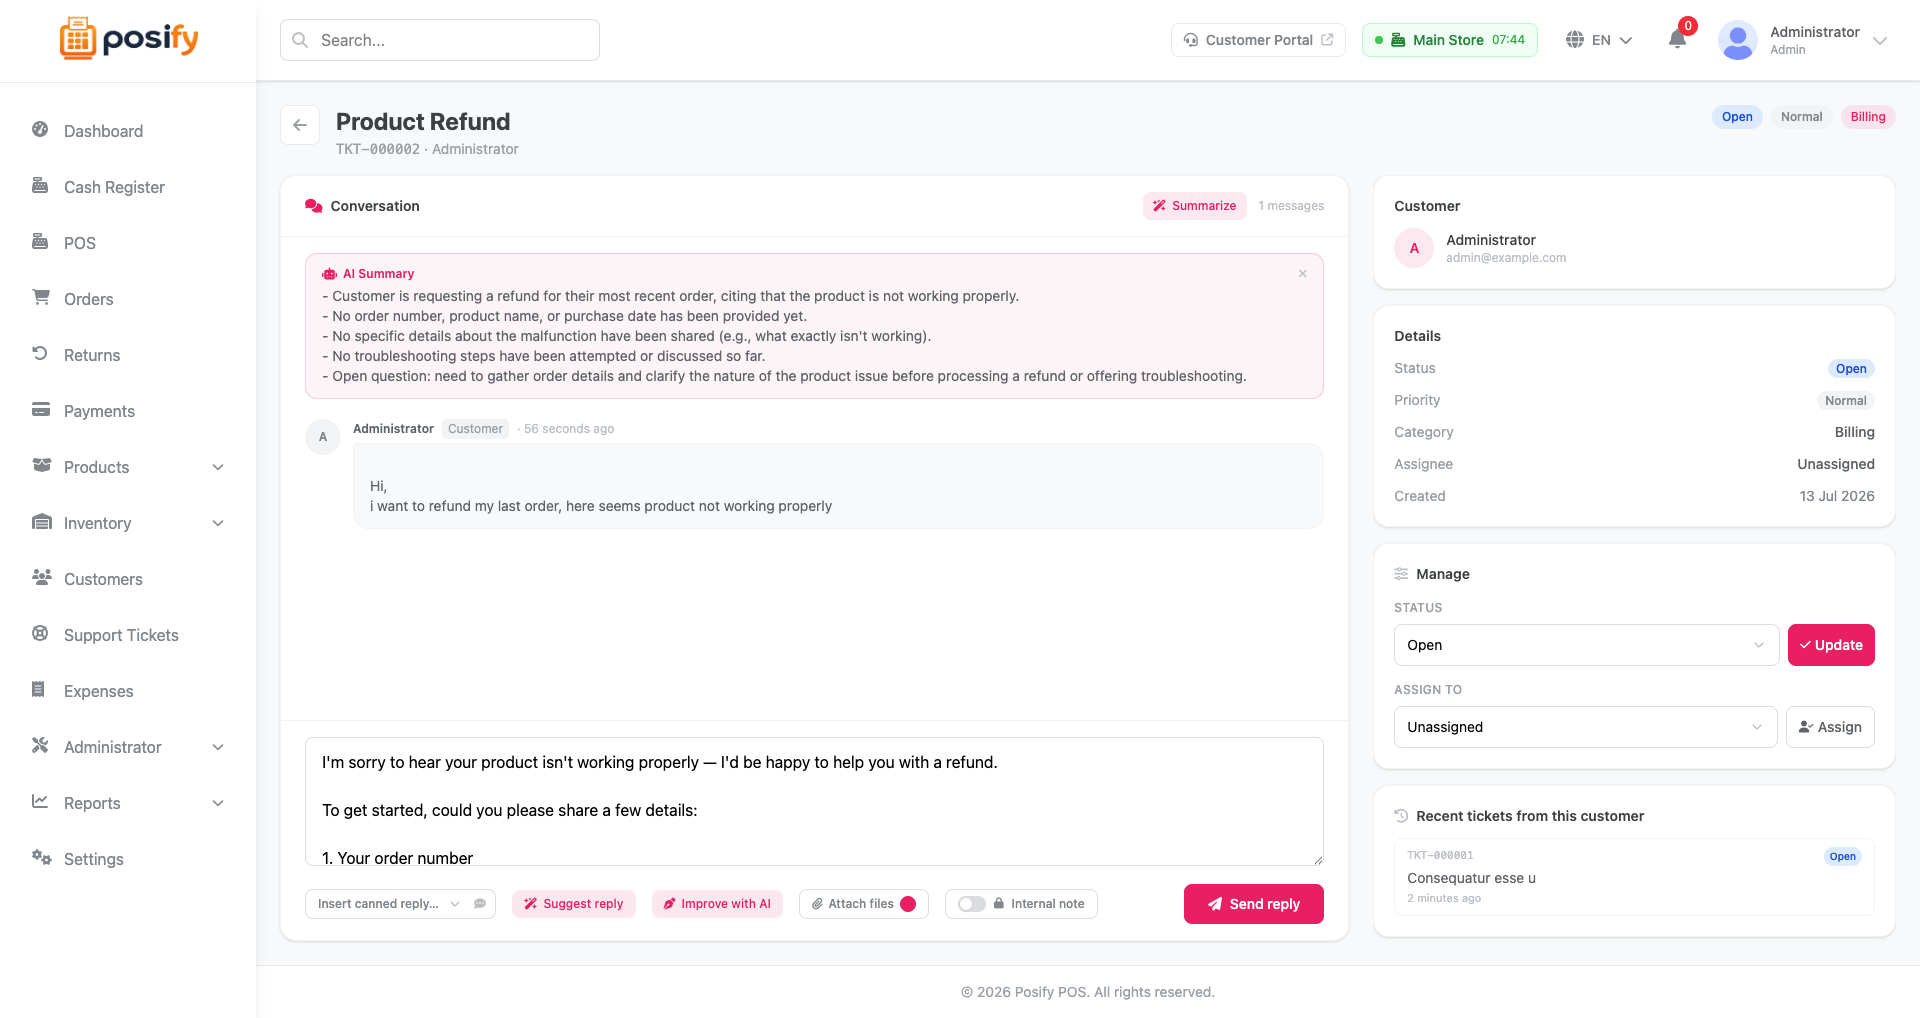
🎧 Help-desk reply assist
On any support ticket, agents with the support-tickets_reply permission see three buttons:
- ✓ Summarize — a 3–5 bullet recap of the whole conversation, so an agent can catch up instantly.
- ✓ Suggest reply — drafts the next reply to the customer; the agent reviews and edits before sending.
- ✓ Improve with AI — takes a reply you've already typed and polishes grammar and tone while keeping every fact, name and number intact.
Nothing is ever sent automatically — a human always reviews and clicks send. Staff-only internal notes are excluded from what the model sees.
🏷️ Automatic ticket triage
When enabled in settings, these run in the background — the agent never waits on the AI provider:
- ✓ Category chosen from your existing ticket categories (new tickets only, and only if not already set).
- ✓ Priority assigned as low / normal / high / urgent (new tickets).
- ✓ Sentiment badge on the ticket, refreshed each time the customer replies.
📦 Product Insights
On a product's detail page, staff with products_edit can click Analyze to get a catalog-quality report:
- ✓ An overall score (0–100) plus four scored dimensions: SEO, Content, Images, and Inventory & Pricing.
- ✓ Short, concrete, actionable feedback per dimension (e.g. "Add at least two more product photos").
- ✓ The report is cached on the product, so it stays visible until you re-analyze.
How It Works & Privacy
- • What is sent. Only what's needed for the task — a ticket transcript (subject + public replies) for help-desk features, or a product's fields (name, description, category, pricing, stock signals, image count) for Product Insights. The request goes over HTTPS to the provider you selected.
- • What is never sent. Staff-only internal notes are stripped from ticket transcripts. Nothing at all leaves your server when AI is switched off or unconfigured.
- • Your key stays yours. The API key is encrypted at rest and used only to authenticate your own requests to your chosen provider.
- • Fails safe. Every AI request has a 45-second timeout, and any provider error is logged and swallowed — the feature simply returns nothing rather than breaking the page. Automatic triage is best-effort and never blocks ticket creation or replies.
- • Data handling beyond your server is governed by your chosen provider's terms — review Anthropic's, OpenAI's or Google's data-usage policy before enabling AI on sensitive data.
Help Desk & Customer Portal
Posify includes a built-in support desk for your team plus a customer-facing portal and a public help centre. This is the module the AI Assistant's help-desk features plug into, but it works perfectly well on its own without AI.
🗂️ Agent inbox
- ✓ Tickets with categories, priority & status
- ✓ Assign tickets to team members
- ✓ Threaded replies, attachments & internal notes
- ✓ Shared & personal canned replies
🌐 Customer portal & help centre
- ✓ Customers raise & track their own tickets
- ✓ Public help centre anyone can browse
- ✓ Served at
/portal&/helpby default - ✓ Optional dedicated subdomain
Optional: serve the portal from its own subdomain. By default the portal and help centre live under /portal and /help on your main domain. To serve them from a subdomain instead (e.g. support.example.com), set in .env:
PORTAL_DOMAIN=support.example.com
# For one shared login across the main app and the subdomain,
# also set SESSION_DOMAIN to the shared parent:
SESSION_DOMAIN=.example.com
Point that host at the same app in your web server, then run php artisan optimize:clear. Route names are identical either way, so links adapt automatically.
REST API
Posify ships a token-authenticated REST API under /api/v1, built on Laravel Sanctum. It is what the staff mobile app talks to, and it is available for your own integrations. No extra setup is needed — it is enabled on every install.
Getting a token
curl -X POST https://yourdomain.com/api/v1/login \
  -H "Accept: application/json" \
  -d "email=you@example.com&password=your-password"

# -> { "token": "1|abcdef...", "user": { ... } }
Send it on every subsequent request:
curl https://yourdomain.com/api/v1/products \
  -H "Accept: application/json" \
  -H "Authorization: Bearer 1|abcdef..."
Endpoint groups
| Group | Auth | What it covers |
|---|---|---|
| basic-info, categories, products, languages | None | Public catalog and store settings |
| login, register, forgot-password | None | Issue a token (throttled 10/min) |
| profile, orders | Bearer | The signed-in customer's own data only |
| staff/* | Bearer + permission | Store-wide: inventory, customers, tickets. Each endpoint checks the caller's role permissions |
per_page (max 100).
POST /api/v1/logout; you can also clear them from the database if a device is lost.
The full endpoint table, with every route and its description, is in README.md in the application root.
Staff Mobile App
Your download includes posify-app.zip — the full Flutter source for an optional staff companion app (Android and iOS). It gives staff product and price lookup, camera barcode scanning, customer and order lookup, inventory and low-stock views, and the support desk on the shop floor.
✅ Requirements
- Flutter 3.29.x or later
- Dart SDK
>=3.11.0 <4.0.0 - Android Studio or VS Code
- Git
- Android SDK (API 21+)
- Xcode 15+ (macOS only, for iOS)
- CocoaPods (iOS dependencies)
- Your Posify server reachable over HTTPS
Verify your setup with flutter doctor — every item should show a green checkmark before you start. Publishing also needs a Google Play and/or Apple Developer account.
🚀 Installation
Extract posify-app.zip, open the folder, and install dependencies:
cd posify-app
flutter pub get
Set your base URL (next section), then run it on a connected device or emulator:
flutter run
flutter run -d android    # pick a target explicitly
flutter run -d ios
🔗 Base URL setup
The app ships pointing at a placeholder and fails fast with a config error until you set your own domain. Open lib/utils/constants.dart and edit the ApiEndpoints class:
// lib/utils/constants.dart
class ApiEndpoints {
  static const String baseUrl = String.fromEnvironment(
    'API_BASE_URL',
    defaultValue: 'https://pos.your-domain.com/api/v1',  // replace this
  );
Or leave the file alone and pass it per build — this wins over the default:
flutter run --dart-define=API_BASE_URL=https://pos.your-domain.com/api/v1
flutter build apk --release --dart-define=API_BASE_URL=https://pos.your-domain.com/api/v1/api/v1 prefix and use no trailing slash. Point it at the domain serving your Posify install.
To test against a backend on your own machine:
- Android emulator →
http://10.0.2.2:8000/api/v1 - iOS simulator →
http://127.0.0.1:8000/api/v1
Plain HTTP is allowed only for those two hosts; every other host must be HTTPS. A Herd/Valet .test domain will not work on the iOS simulator — its self-signed certificate is untrusted.
✏️ Change the app name
// android/app/src/main/AndroidManifest.xml
android:label="YourAppName"

// ios/Runner/Info.plist
<key>CFBundleName</key>
<string>YourAppName</string>
📦 Change the package name
The app ships as com.axify.posify. Change it to your own before publishing — the store rejects a package ID you do not own. Android uses the Kotlin Gradle DSL:
// android/app/build.gradle.kts
android {
    namespace = "com.yourcompany.yourapp"
    defaultConfig {
        applicationId = "com.yourcompany.yourapp"
    }
}
Then find-and-replace com.axify.posify across the project (Ctrl+Shift+R, or ⌘+Shift+R on macOS) and check these landed:
android/app/build.gradle.ktsandroid/app/src/main/AndroidManifest.xmlandroid/app/src/main/kotlin/— the folder structure must mirror the new ID- iOS bundle identifier — set in Xcode, see below
flutter clean && flutter pub get && flutter run🎨 Change the app icon
Replace assets/icons/posify-app-icon.png with your own square PNG — 1024×1024, no transparency (iOS rejects an alpha channel). Then regenerate every size for both platforms:
dart run flutter_launcher_iconsNo external icon generator needed — flutter_launcher_icons is already set up under the flutter_launcher_icons: key in pubspec.yaml. Re-run it whenever you change the source image.
🤖 Build for Android
Step 1 — Create a signing keystore. Back up the .jks file and its passwords somewhere safe and private: lose them and you cannot ship an update to an existing listing.
keytool -genkey -v -keystore ~/upload-keystore.jks \
  -storetype JKS -keyalg RSA -keysize 2048 -validity 10000 -alias upload
Step 2 — Create android/key.properties by copying android/key.properties.example and filling it in:
storePassword=your_store_password
keyPassword=your_key_password
keyAlias=upload
storeFile=/absolute/path/to/upload-keystore.jksandroid/key.properties is missing. That is deliberate — it stops a debug-signed build from ever reaching the Play Store, which Google would reject. Debug builds and flutter run are unaffected.
Step 3 — Build. Use an AAB for the Play Store; an APK for direct install or sideloading:
# AAB — Google Play Store
flutter build appbundle --release
# Output: build/app/outputs/bundle/release/app-release.aab

# APK — direct install
flutter build apk --release
# Output: build/app/outputs/flutter-apk/app-release.apk

# Split APKs — smaller download per device
flutter build apk --release --split-per-abi
🍎 Build for iOS
Step 1 — Install CocoaPods dependencies:
cd ios && pod install && cd ..Step 2 — Open the workspace (not the .xcodeproj):
open ios/Runner.xcworkspaceStep 3 — Configure signing. Select the Runner target → Signing & Capabilities → set your Team, and change the Bundle Identifier to your own (e.g. com.yourcompany.posify).
Step 4 — Archive and distribute:
flutter build ipaOr from Xcode: set the scheme to Any iOS Device → Product → Archive → in Organizer, Distribute App → App Store Connect.
The same instructions, plus an API endpoint reference and security notes, are in README.md inside posify-app.zip.
Updating to a New Version
mysqldump) and copy your .env file and storage/app folder somewhere safe before you overwrite anything.
- Download the new release ZIP from your CodeCanyon downloads page.
- Put the site into maintenance mode:
php artisan down - Replace the application files, but keep these: your
.env,storage/(uploads and logs), andpublic/storageif it is a real symlink. - Reinstall dependencies:
composer install --no-dev --optimize-autoloader - Apply any new migrations:
php artisan migrate --force - Clear stale caches:
php artisan optimize:clear - Repair the uploads symlink if images 404:
php artisan posify:install-assets - Bring it back up:
php artisan up
storage/installed.lock. It is what tells Posify it is already set up. Removing it sends every visitor back to the installer.
If you run a queue worker, restart it after updating so it picks up the new code: php artisan queue:restart. See the Queue Worker section.
Third-Party Licenses
Posify POS bundles open-source libraries. Most use permissive MIT/BSD/Apache licenses; two are LGPL and worth knowing about:
vendor/ after composer install. Using them as-is places no obligation on your own code — only modifying the libraries themselves would.
The full list of bundled third-party libraries and their licenses is in credits.txt in the application root.